


6.7. Adding Scripts to a Web Page
JavaScript code can be inserted into HTML pages and make them interactive.
Scripts should be inserted to an HTML file between <script> and </script> tags.
Below, an example JavaScript code is presented:
<script type="text/javascript">
  // Show a simple alert window with the "Hello World!" text.
  $(document).ready(function() {
    alert('Hello World!');
  });
</script>
In the example above, we created the <script> element, and put the jQuery callback function in it.
The jQuery binds a function to be executed when the DOM has finished loading. When the function is executed, a simple
alert window with the "Hello World!" text and OK button will appear.
Since you put this JavaScript code inside the HTML file, we will refer to it as inline script.
An alternative way of storing JavaScript code is putting it in an external .js file.
External files typically contain code that is designed to be used by
several web pages. Typically, external JavaScript files are stored in APP_DIR/public/js/ directory. To link
an external JS file to your HTML page, you add the <script> element like below:
<script type="text/javascript" src="/js/yourscript.js"></script>
When the browser encounter such a <script> element, it reads the external JS file
and executes the code.
Generally, there are two places inside an HTML file where you can put the script:
JavaScript code can be put in the
<head>section of an HTML page. This method is recommended to use when you need JavaScript to be loaded before the content of the page. We used this method for loading the Twitter Bootstrap JavaScript extensions and jQuery library.Script can be placed at the bottom of the
<body>section of an HTML page, just before the closing</body>tag. This way is acceptable when you need the entire DOM14 to be loaded before the script can start executing.
14) The DOM (Document Object Model) is a convenient representation of an HTML document structure as a tree of elements.
If a certain JavaScript file needs to be used on all (or on most) of the web pages, it is better to place it in layout view template. But when a script needs to be used on a single page only, putting it in the layout template is not the best idea. If you put such a script to layout template, the script will be loaded to all pages, which can produce an unneeded traffic and increase page load time for the whole site. To avoid this, you can add such a script for the desired page only.
To add a page-specific script which will be put in the <head> section of the web page,
you use the HeadScript view helper. Its methods are summarized by table 6.1:
| Method name | Description |
|---|---|
appendFile() |
Puts a link to external JS file after all others. |
offsetSetFile() |
Inserts a link to external JS file in a given list position. |
prependFile() |
Puts a link to external JS file before all others. |
setFile() |
Clears the list of scripts and puts the single external JS file in it. |
appendScript() |
Puts an inline script after all others. |
offsetSetScript() |
Inserts an inline script to a given list position. |
prependScript() |
Puts an inline script before all others. |
setScript() |
Clears the list of inline scripts and puts the single inline script in it. |
To add a link to external JS file to the <head> section, of a page, you add the following PHP
code in the beginning of your view template (.phtml) file:
<?php
$this->headScript()->appendFile('/js/yourscript.js', 'text/javascript');
?>
In the code above, we called the appendFile() method of the HeadScript view helper.
This method takes two arguments. The first one is the path to external JS file (if the
file is stored inside of APP_DIR/public/js directory, or an URL of a JS file if the file
is located on another web server). The second argument is the type of the script
(it is typically equal to "text/javascript").
Other methods provided by HeadScript view helper (such as prependFile(), offsetSetFile() and
setFile()) differentiate only in the position in the list of scripts into which the new script will
be inserted.
The methods prependScript(), appendScript(), offsetSetScript() and setScript()
are designed to insert an inline JavaScript code. They are rarely used, because
you typically insert external JS scripts in the head section of the document
To insert a script to the end of the <body> section of the document, you can use the
InlineScript view helper 15. It provides exactly the same methods as the
HeadScript view helper. Below, an example is presented which can be used to append an
inline JavaScript code to the end of document body:
15) The name InlineScript does not fully reflect the capabilities of this view helper.
Actually, it can insert both inline and external scripts. The better name for this
view helper would be BodyScript, because it is intended for inserting scripts in
document body.
<?php
$script = <<<EOT
  $(document).ready(function() {
    alert('Hello World!');
  });
EOT;
$this->inlineScript()->appendScript($script);
In the example above, we used the PHP's Heredoc 16 syntax to fill in the $script
variable with the inline JavaScript code. Then we call the appendScript() function on
the InlineScript view helper and pass the code as its argument.
16) Heredoc is an alternative string definition method provided by PHP. It works well with multi-line strings.
But, using the InlineScript view helper may be not very convenient in sense of readability.
Moreover, NetBeans IDE syntax checker will be stuck on the Heredoc notation
and will not recognize the JavaScript code. To fix this, you can simply put the <script>
element at the bottom of your view template, as shown in the example below:
<!-- Page content goes first -->

<!-- Inline script goes last -->
<script type="text/javascript">
  $(document).ready(function() {
    // Show a simple alert window with the "Hello World!" text.
    alert("Hello World!");
  });
</script>
This ensures the same effect is achieved as with InlineScript view helper, but allows for
better script readability and automatic syntax checking in NetBeans IDE.
For
HeadScriptandInlineScriptview helpers to work, you should ensure their content is echoed in layout view template (look at lines 23 and 62 of layout.phtml file). If you remove those lines from the layout template, the scripts won't be inserted in the web page.
6.7.1. Example
For a real-life example of inserting a JavaScript code in your web page, let's add a page with auto-complete feature. With this feature, the web browser will predict a word or phrase that the user wants to type in by several first letters, without the user actually entering the text completely. We can use an auxiliary JavaScript library called Twitter Typeahead. Analogous to Twitter Bootstrap, the Typeahead library was developed in Twitter Inc. for their internal purposes and is distributed freely.
Download typeahead.min.js file (a minified version of the Typeahead library) from the official project page. When the download is finished, place the file in your APP_DIR/public/js directory.
Then add the typeahead.phtml file in your application/index/static subdirectory
under the module's view directory.
This directory is served by the StaticRoute route type that we've created and configured
earlier in chapter Routing, and all "static" pages placed here will
automatically become available to site users.
In the typeahead.phtml view template file, put the following content:
<?php
$this->headTitle('Typeahead');
// Add a JavaScript file
$this->headScript()->appendFile('/js/typeahead.min.js', 'text/javascript');
?>

<h1>Typeahead</h1>
<p>Type a continent name (e.g. Africa) in the text field below:</p>
<input type="text" class="typeahead" title="Type here"/>

<script type="text/javascript">
  $(document).ready(function() {
    $('input.typeahead').typeahead({
       name: 'continents',
       local: [
            'Africa',
            'Antarctica',
            'Asia',
            'Europe',
            'South America',
            'North America'
        ]
    });
  });
</script>
In the code above, we set the title for the page (line 2), then
we append the typeahead.min.js file to the <head> section of the
page with the HeadScript view helper (line 4).
In line 9, we create a text input field where the user will be able to
enter some text. We mark the input field with the typeahead CSS class.
Lines 11-25 contain inline JavaScript code placed at the bottom of the
view template (we don't use InlineScript view helper for better code
readability).
In line 12, we have the jQuery event handler bound to the "document is ready" event. This event is fired when the complete DOM tree has been loaded.
In line 13, we have the jQuery selector ("input.typeahead") which selects
all input fields marked with the typeahead CSS class and execute the typeahead()
function on them.
The typeahead() function binds the change event handler to the text
input field. Once the user enters a character in the field, the handler is executed
and checks the letters entered. It then displays the dropdown menu with suggested
auto-completion variants.
The typeahead() function takes two arguments: the name argument identifies
the dataset, and the local argument is a JSON array containing the available
auto-completion variants.
To give the auto-completion field and its dropdown menu a nice-looking visual appearance, add the following CSS rules to your style.css file.
.typeahead,
.tt-query,
.tt-hint {
  width: 396px;
  height: 30px;
  padding: 0px 12px;
  font-size: 1.1em;
  border: 2px solid #ccc;
  border-radius: 4px;
  outline: none;
}

.tt-dropdown-menu {
  width: 422px;
  margin-top: 12px;
  padding: 8px 0;
  background-color: #fff;
  border: 1px solid #ccc;
  border: 1px solid rgba(0, 0, 0, 0.2);
  border-radius: 4px;
}

.tt-suggestion {
  padding: 3px 20px;
  font-size: 1.1em;
  line-height: 24px;
}

.tt-suggestion.tt-is-under-cursor {
  color: #fff;
  background-color: #0097cf;
}

.tt-suggestion p {
  margin: 0;
}
To see the auto-completion feature in work, type the "http://localhost/typeahead" URL in your browser and press Enter. The Typeahead page will appear with the prompt to enter a continent name. For example, type a letter to see how Typeahead suggests you available variants (figure 6.7).
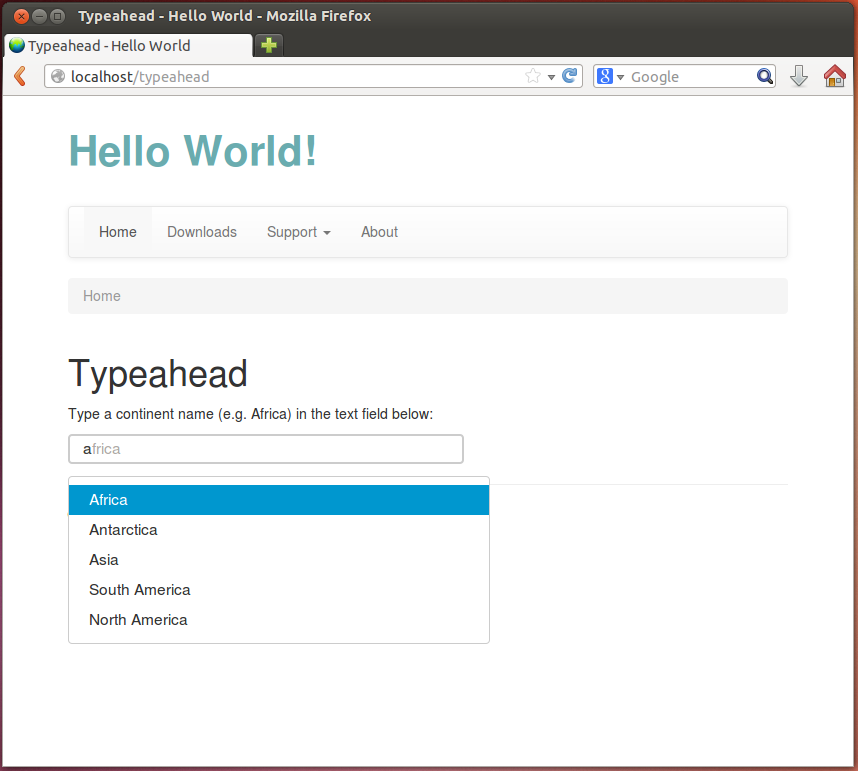 Figure 6.7. Auto-complete feature
You can see this example working in the Hello World sample bundled with this book by typing the URL "http://localhost/typeahead" in your browser.