


12.2. Creating a Simple MySQL Database
For the Blog sample to work, we need to have a database. In this book, we use MySQL database management system, which is very simple in installation and administration.
For OS-specific instructions on how to install MySQL server and client, please refer to Appendix A. Configuring Web Development Environment.
Once you install MySQL, type the following command from your command shell to log into MySQL client console:
mysql -u root -p
When asked for, type the password of the root user (the password of the root user is the one you've specified during MySQL server installation). On successful login, you should see the following welcome message:
Welcome to the MySQL monitor.  Commands end with ; or \g.
Your MySQL connection id is 4
Server version: 5.7.13-0ubuntu0.16.04.2 (Ubuntu)

Copyright (c) 2000, 2016, Oracle and/or its affiliates. All rights reserved.

Oracle is a registered trademark of Oracle Corporation and/or its
affiliates. Other names may be trademarks of their respective
owners.

Type 'help;' or '\h' for help. Type '\c' to clear the current input statement.

mysql>
Now you are able to type MySQL client commands (like show databases, show tables, etc.) or
SQL queries (like SELECT or INSERT) at the MySQL prompt and see their output.
If you want to quit of the MySQL prompt, type
quitand press Enter.
12.2.1. Creating New Database
Let's create a database and name it blog. To do that, type the following SQL statement and
press Enter:
CREATE DATABASE blog;
The expected output of this command is the following:
Query OK, 1 row affected (0.01 sec)
MySQL commands are case insensitive, so you could type
create database blog;with the same result. We recommend using upper case for SQL queries, since this is a common convention.
Next, we create the user named blog and grant it all privileges for accessing and modifying the
blog database and all its tables:
GRANT ALL PRIVILEGES ON blog.* TO blog@localhost IDENTIFIED BY '<passwd>';
In the command above, replace the password placeholder with the new password for the blog user.
This password should be different than the password of the root user.
Here, we create the second user
blog, because it is not recommended to give the web application ability to log into database under therootuser. The root user has unlimited rights and it is poor security practice to give an application the ability to do any actions it wants. Thebloguser will have permissions to modify theblogdatabase only, which is sufficient in our case.
You can check that the database has been created by typing the following command and pressing Enter:
show databases;
You should be able to see the output like below (note the blog line in the list of databases):
+--------------------+
| Database           |
+--------------------+
| information_schema |
| blog               |
| mysql              |
| performance_schema |
+--------------------+
12.2.2. Creating Tables
Next, we will create three tables typical for any simple blog: the post table will contain posts,
the comment table will contain comments to posts, and, finally, the tag table will contain tags
(a tag is some kind of a key word describing a blog post well).
Additionally, we will create the fourth auxiliary table post_tag that will be used to create
many-to-many relationship between the post and the tag tables.
Make the blog database current by typing the following from MySQL command prompt:
use blog;
To create the post table, type the following SQL statement:
CREATE TABLE `post` (
  `id` int(11) PRIMARY KEY AUTO_INCREMENT,
  `title` text NOT NULL,
  `content` text NOT NULL,
  `status` int(11) NOT NULL,
  `date_created` datetime NOT NULL
);
MySQL client allows easy entering of multi-line commands. Just press Enter when you want to move the caret to the next line. The command is considered to be fully entered when the semicolon (;) character is encountered.
The expected output of this command is the following:
Query OK, 0 rows affected (0.22 sec)
Next, create the comment table by typing the following:
CREATE TABLE `comment` (
  `id` int(11) PRIMARY KEY AUTO_INCREMENT,
  `post_id` int(11) NOT NULL,
  `content` text NOT NULL,
  `author` varchar(128) NOT NULL,
  `date_created` datetime NOT NULL
);
Then, create the tag table:
CREATE TABLE `tag` (
  `id` int(11) PRIMARY KEY AUTO_INCREMENT,
  `name` VARCHAR(128)
);
And finally, create the post_tag table:
CREATE TABLE `post_tag` (
  `id` int(11) PRIMARY KEY AUTO_INCREMENT,
  `post_id` int(11) NOT NULL,
  `tag_id` int(11) NOT NULL
);
Let's fill the tables we have created with some sample data:
INSERT INTO tag(`name`) VALUES('ZF3');
INSERT INTO tag(`name`) VALUES('book');
INSERT INTO tag(`name`) VALUES('magento');
INSERT INTO tag(`name`) VALUES('bootstrap');

INSERT INTO post(`title`, `content`, `status`, `date_created`) VALUES(
   'A Free Book about Zend Framework',
   'I''m pleased to announce that now you can read my new book "Using Zend Framework 3" absolutely for free! Moreover, the book is an open-source project hosted on GitHub, so you are encouraged to contribute.',
   2, '2016-08-09 18:49');

INSERT INTO post(`title`, `content`, `status`, `date_created`) VALUES(
   'Getting Started with Magento Extension Development - Book Review',
   'Recently, I needed some good resource to start learning Magento e-Commerce system for one of my current web projects. For this project, I was required to write an extension module that would implement a customer-specific payment method.',
   2, '2016-08-10 18:51');

INSERT INTO post(`title`, `content`, `status`, `date_created`) VALUES(
   'Twitter Bootstrap - Making a Professionaly Looking Site',
   'Twitter Bootstrap (shortly, Bootstrap) is a popular CSS framework allowing to make your website professionally looking and visually appealing, even if you don''t have advanced designer skills.',
   2, '2016-08-11 13:01');

INSERT INTO post_tag(`post_id`, `tag_id`) VALUES(1, 1);
INSERT INTO post_tag(`post_id`, `tag_id`) VALUES(1, 2);
INSERT INTO post_tag(`post_id`, `tag_id`) VALUES(2, 2);
INSERT INTO post_tag(`post_id`, `tag_id`) VALUES(2, 3);
INSERT INTO post_tag(`post_id`, `tag_id`) VALUES(3, 4);

INSERT INTO comment(`post_id`, `content`, `author`, `date_created`) VALUES(
    1, 'Excellent post!', 'Oleg Krivtsov', '2016-08-09 19:20');
If necessary, you can easily remove the database and all tables and data it contains by typing the following command from MySQL prompt:
DROP DATABASE blog;
Figure 12.3 graphically illustrates what entities we have in the database and what relationships between those entities present.
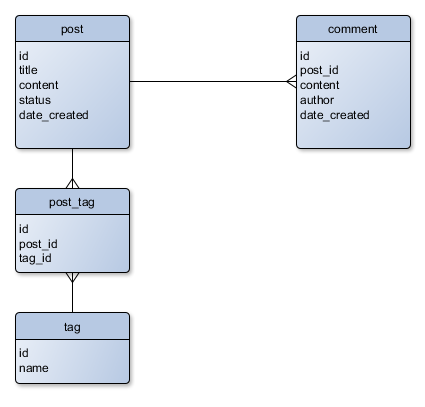 Figure 12.3. Graphical representation of database schema
As you can see from figure 12.3, the post table is related to comment table as one-to-many,
because a single post may have many comments. This is also called the "one-to-many" relationship.
The post table is also related to the tag table as many-to-many. A single post may have many tags,
and a single tag may belong to many posts as well. Many-to-many relationship is typically implemented
through an auxiliary table (post_tag table in our case).
12.2.3. Importing Ready Database Schema
In the previous section, we've shown how to create the complete database schema that is used in the
Blog sample web application. In the real life, you typically do not type all those SQL
statements at the MySQL prompt. Instead, you could type the CREATE TABLE statements to a file and save
it to disk. Then you could just import that file and have the ready schema.
For your convenience, the ready schema for Blog sample can be found in APP_DIR/data/schema.mysql.sql file. The file is a plain text file containing SQL statements. To import the file, go to the APP_DIR/data/ directory and type the following command from your command shell (but not from MySQL prompt):
mysql -u root -p blog < schema.mysql.sql
When prompted for password, enter the password of the root user and press Enter.
Once this is done, log into the MySQL client and type the following commands:
use blog;

show tables;
You should see the list of tables created, something like below:
+----------------+
| Tables_in_blog |
+----------------+
| comment        |
| post           |
| post_tag       |
| tag            |
+----------------+
4 rows in set (0.00 sec)
Also consider using database migrations for initializing database schema. For additional info about migrations, please refer to Database Migrations chapter.