


7.11. Using the Form in a Controller's Action
When the form model class is ready, you finally can use the form in a controller's action method.
As you might already know, the way the site user works with form is typically an iterative process (schematically illustrated by figure 7.18):
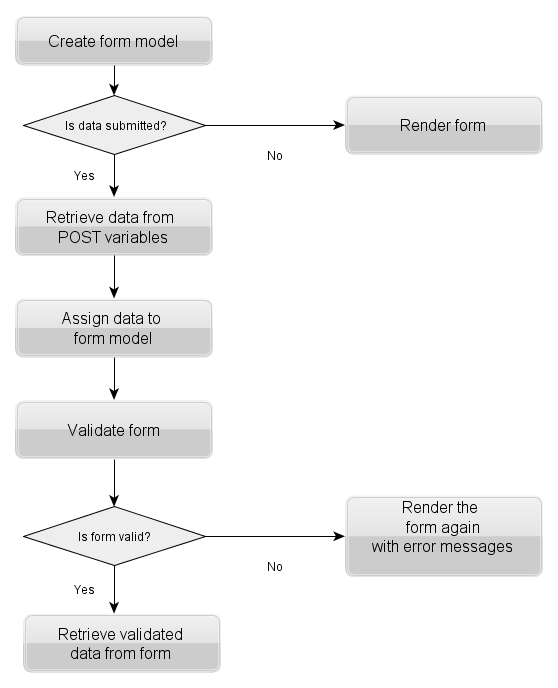 Figure 7.18. Typical form usage workflow
- First, you display the form and its fields on a web page, prompting user for input. Once the user fills the form fields, he clicks the Submit button and sends the data to server.
- Next, your controller extracts the submitted data and asks the form model to validate it. If there were input errors, you display the form again, asking the user to correct input errors. If the data is correct, you process the data with your business logic layer and (usually) redirect the user to another web page.
The Form base class provides several methods for accomplishing these (see table 7.11).
| Method name | Description |
|---|---|
setData($data) |
Sets form data for validation. |
getData($flag) |
Retrieves the validated data. |
isValid() |
Validates the form. |
hasValidated() |
Check if the form has been validated. |
getMessages($elementName = null) |
Returns a list of validation failure messages, if any, for a single element or for all form elements. |
So, a generic form usage workflow is the following:
Check whether the form data has been submitted, and if not, display the form on the web page.
If the data has been submitted by site user, the raw data is retrieved from
POST(and/orGET) variables in the form of an array.The data is assigned to the form model's fields using the form's
setData()method.The filtering and validation is performed using the form's
isValid()method (this results in executing the input filter attached to the form). If a certain field(s) is/are invalid, display the form again and ask the user to correct their input.As soon as the data has been filtered/validated you retrieve the data from the form model using the
getData()method and can pass the data to other models or use it any other way.
The code example below illustrates how to implement this typical workflow in your controller's action method:
<?php
namespace Application\Controller;

use Application\Form\ContactForm;
// ...

class IndexController extends AbstractActionController
{
  // This action displays the feedback form
  public function contactUsAction()
  {
    // Create Contact Us form
    $form = new ContactForm();

    // Check if user has submitted the form
    if($this->getRequest()->isPost())
    {
      // Fill in the form with POST data
      $data = $this->params()->fromPost();
      $form->setData($data);

      // Validate form
      if($form->isValid()) {

        // Get filtered and validated data
        $data = $form->getData();

        // ... Do something with the validated data ...

        // Redirect to "Thank You" page
        return $this->redirect()->toRoute('application', ['action'=>'thankYou']);
      }
    }

    // Pass form variable to view
    return new ViewModel([
          'form' => $form
       ]);
  }
}
In the code above, we define the contactUsAction() action method in the
IndexController class (line 10). In the action method, we create an instance
of the ContactForm class (line 13).
Then, in line 16, we check whether the request is a POST request (checking the starting line of HTTP request).
In line 19 we retrieve the raw data submitted by the user. We extract all the POST variables
with the help of the Params controller plugin. The data is returned in the form of an array and
saved into the $data variable.
The data submitted by the user may contain mistakes and should be filtered and validated
before further usage. To do that, in line 20 we set the data to the form model with the
setData() method provided by the Form base class. We validate form data with the
isValid() method (line 23), which returns true upon successful validation.
If the validation succeeds, we retrieve the validated data using the getData()
method (line 26) and then can pass the data to our business logic layer.
Once we have used the validated data, in line 31, we redirect the web user to the
Thank You page. The redirect is performed with the Redirect controller plugin.
The Redirect plugin's toRoute() method takes two parameters: the first parameter is the
name of the route ("application"), and the second one is the array of parameters
to pass to the router. These identify the web page where you redirect the user.
We will prepare the controller's action and view template for the Thank You page a little bit later.
In line 37, we pass the form model through the $form variable to the view template. The view template
will access this variable and will use it for rendering the form (and possible
validation errors).
7.11.1. Passing Form Data to a Model
To give you a real-life example of how you can use the validated data of the feedback form,
in this section we will create a simple MailSender model 24 class which
can be used for sending an E-mail message to an E-mail address. When the user submits the form,
we will validate the form data and pass the validated data to the MailSender model and ask
it to send the E-mail message to the recipient.
24) In DDD terms, the MailSender can be related to service models, because its goal
is to manipulate data, not to store data.
Reading this section is optional and intended mostly for beginners. You may skip it and refer directly to the next section Form Presentation.
The MailSender model will internally use the Zend\Mail component. The Zend\Mail component
is a component provided by Zend Framework 3 and designed to give you the convenient functionality
for composing mail messages (the Zend\Mail\Message class) and several classes implementing available
transports for sending mail (in this example, we will use the Zend\Mail\Transport\Sendmail class which
uses the sendmail program for delivering E-mails).
Install the
Zend\Mailcomponent with Composer by typing the following command:
php composer.phar require zendframework/zend-mail
The sendmail program is a free open-source mail transfer agent for Linux/Unix operating systems. It accepts messages that a PHP script passes to it, deciding based upon the message header which delivery method it should use, and then passes the message through the SMTP protocol to the appropriate mail server (like Google Mail) for delivery to the recipient.
Start with creating the MailSender.php file under the Service directory under the module's source directory (see figure 7.19 for example).
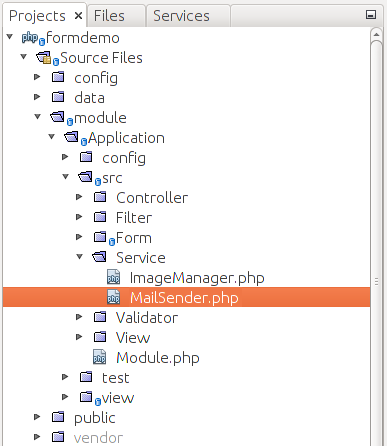 Figure 7.19. Creating the MailSender.php File
The following is the code that should be put into the MailSender.php file:
<?php
namespace Application\Service;

use Zend\Mail;
use Zend\Mail\Message;
use Zend\Mail\Transport\Sendmail;

// This class is used to deliver an E-mail message to recipient.
class MailSender
{
  // Sends the mail message.
  public function sendMail($sender, $recipient, $subject, $text)
  {
    $result = false;
    try {

      // Create E-mail message
      $mail = new Message();
      $mail->setFrom($sender);
      $mail->addTo($recipient);
      $mail->setSubject($subject);
      $mail->setBody($text);

      // Send E-mail message
      $transport = new Sendmail('-f'.$sender);
      $transport->send($mail);
      $result = true;
    } catch(\Exception $e) {
      $result = false;
    }

    // Return status
    return $result;
  }
}
In the code above, we define the Application\Service namespace (line 2), because
the MailSender class can be related to service models (its goal is to manipulate
data, not to store it).
In lines 4-6, we declare the aliases for the Mail, Message and Zend\Mail\Transport\Sendmail
classes provided by the Zend\Mail component.
In lines 9-35, we define the MailSender class. The class has the single method
sendMail() (line 12), which takes four arguments: sender's E-mail address, recipient's E-mail address,
message subject and, finally, message body text.
In line 18, we create an instance of the Message class. We use the methods provided
by this class for composing the message (set its subject, body etc.) in lines 19-22.
In line 25, we create an instance of the Sendmail class, which uses the sendmail
program to pass the message to the appropriate mail server (see lines 25-26). Since the classes
provided by the Zend\Mail component may throw an exception on failure, we enclose the
block of code with the try-catch exception handler.
The sendMail() method will return true if the E-mail message sent successfully; otherwise
it will return false (line 33).
Configuring mail system for your web server is a rather complex task. It typically requires installing sendmail and configuring the server's MX DNS record to use certain mail server (either local mail server, e.g. Postfix, or remote server, like Google Mail). Because of the complexity of the topic, it is not discussed in this book. You can find additional information on configuring mail for your particular system online.
Now, register the MailSender service in your module.config.php file as follows:
return [
    //...
    'service_manager' => [
        'factories' => [
            Service\MailSender::class => InvokableFactory::class,
        ],
    ],

    //...
];
Later, you can instantiate the MailSender model in your IndexController::contactUsAction()
method and pass it the validated form data.
Because we use the
MailSenderservice in our controller, this service is a dependency for the controller. So, we will need to create a factory for the controller and inject the dependency into controller's constructor. Looks complex at the first sight, but as you improve your skills, you will find this is rather simple and greatly improves the structure of your code.
Let's create the factory for the IndexController (put it into the Factory subdirectory under the Controller subdirectory).
You can see that the only work of the factory class is creating the controller and passing it the dependency.
<?php
namespace Application\Controller\Factory;

use Interop\Container\ContainerInterface;
use Zend\ServiceManager\Factory\FactoryInterface;
use Application\Service\MailSender;
use Application\Controller\IndexController;

class IndexControllerFactory
{
    public function __invoke(ContainerInterface $container,
                             $requestedName, array $options = null)
    {
        $mailSender = $container->get(MailSender::class);

        // Instantiate the controller and inject dependencies
        return new IndexController($mailSender);
    }
}
Modify the module.config.php file to use the custom factory we have just created:
return [
    //...
    'controllers' => [
        'factories' => [
            Controller\IndexController::class => Controller\Factory\IndexControllerFactory::class,
        ],
    ],

    //...
];
Next, add the constructor, the contactUsAction(), thankYouAction() and sendErrorAction()
methods to the controller. Below, the complete code is presented:
<?php
// ...
use Application\Service\MailSender;

class IndexController extends AbstractActionController
{
  private $mailSender;

  public function __construct($mailSender)
  {
    $this->mailSender = $mailSender;
  }

  public function contactUsAction()
  {
    // Create Contact Us form
    $form = new ContactForm();

    // Check if user has submitted the form
    if($this->getRequest()->isPost()) {

      // Fill in the form with POST data
      $data = $this->params()->fromPost();

      $form->setData($data);

      // Validate form
      if($form->isValid()) {

        // Get filtered and validated data
        $data = $form->getData();
        $email = $data['email'];
        $subject = $data['subject'];
        $body = $data['body'];

        // Send E-mail
        if(!$this->mailSender->sendMail('no-reply@example.com', $email,
                        $subject, $body)) {
          // In case of error, redirect to "Error Sending Email" page
          return $this->redirect()->toRoute('application',
                        ['action'=>'sendError']);
        }

        // Redirect to "Thank You" page
        return $this->redirect()->toRoute('application',
                        ['action'=>'thankYou']);
      }
    }

    // Pass form variable to view
    return new ViewModel([
      'form' => $form
    ]);
  }

  // This action displays the Thank You page. The user is redirected to this
  // page on successful mail delivery.
  public function thankYouAction()
  {
    return new ViewModel();
  }

  // This action displays the Send Error page. The user is redirected to this
  // page on mail delivery error.
  public function sendErrorAction()
  {
    return new ViewModel();
  }
}
As you can see from the code above, we do the following:
In line 3, we declare an alias for
Application\Service\MailSenderclass. This will allow you to refer to the model class by its short name.In lines 32-34, after we've validated the form, we extract the validated field values into the
$email,$subjectand$bodyPHP variables.In line 37, we call the
sendMail()method of theMailSenderservice and pass it four parameters: the sender's address (here we use "no-reply@example.com", but you can replace this with the address of your sendmail); the recipient's E-mail address, the E-mail subject and body.If mail has been sent successfully (if the
sendMail()method returnedtrue), we redirect the user to the Thank You page (line 45). On failure (ifsendMail()method returnedfalse), we redirect the user to the Send Error page (line 40).In lines 58-61, we have the
thankYouAction()method which displays the Thank You page. This page is shown if the E-mail message is sent successfully.In line 65-68, we have the
sendErrorAction()method which shows the Error Sending Email page. This page is shown on E-mail delivery failure.