


7.10. Adding Form Filtering and Validation Rules
Form validation is the procedure of filtering and checking the data passed to the server during the form submission. For example, for our feedback form, we want to perform the following checks:
- We want to test that the E-mail address, message subject, and body fields are always present (because these fields are required).
- We want to ensure that the user entered a valid E-mail address like name@example.com.
- Users may add white space characters to the beginning and/or the end of the E-mail address, so we would like to filter such characters out (perform the string trimming operation).
- It would be useful to check for minimum and maximum allowed length of the message subject and body text.
- For the message subject, we would like to filter out (strip) the new line characters and HTML tags 22.
- We also want to strip HTML tags from the message body.
22) There may be malicious users inserting HTML code in the message. If you open such code in your browser, you may see some undesired content. To avoid this, we need to replace HTML tags in message subject and text.
The requirements above are called filtering and validation rules. Those rules can be divided into two categories: filters and validators.
The filters transform the user-entered data to fix possible errors or to ensure the data conforms to a certain format. Filters are typically applied first, validators are applied in the last turn.
Validators check whether the data is acceptable or not. If all data is correct, the form is considered valid and the data can be safely used by the business logic layer. If a certain field is invalid, a validator raises an error flag. In that case, the form is typically shown to the user again, and the user is asked to correct any input errors and resend the form to server.
What happens if I don't add a validation rule for a certain form field?
If you do not add a validation rule then the user-submitted field value will not be checked, leaving a hole in your site's security. It is recommended to always add a validation rule per each form field entered by user and add as many checks per each field as needed to keep your form secure.
7.10.1. Input Filter
In ZF3, you store the filtering and validation rules with the help of the InputFilter class.
The InputFilter class is defined in the Zend\InputFilter component.
The input filter is a container for so called inputs. Typically, you add an input
per each form model's field you have.
An input may consist of filters and/or validators and some additional information. For example, an input may contain the flag telling if the field is required or if its value may be missing from HTTP request.
Analogous to adding a form model's fields, there are two possible ways of adding
inputs to the input filter container: either via passing an instance of an input
class as the argument of its add() method, or via passing the array specification 23.
In the next section, we will describe the latter method (it is preferable,
because it requires less code to write).
23) In the latter (array specification) case, the input will be
automatically created with the help of the Zend\InputFilter\Factory class.
7.10.2. Adding Inputs to Input Filter
To add an input to the input filter, you use its add() method, which takes the single
argument - an array specification of the input in the following form:
[
  'name'     => '<name>',
  'type'     => '<type>',
  'required' => <required>,
  'filters'  => [
     // Add filters configuration here ...
  ],
  'validators' => [
     // Add validators configuration here ...
  ]
]
In the above array, we have the following keys:
The
namekey (line 2) defines the name of the input. The name should be the same as the name of the form model's field. If the name of the input doesn't match the name of the corresponding form model's field, the validation rule won't be applied to the field.The
typekey (line 3) defines the class name of the input. This key is optional. By default (when this key is omitted), theZend\InputFilter\Inputclass is used. Available input classes are shown in figure 7.16. In figure 7.16, theInputclass is designed to be used with regular scalar values,ArrayInputis used for filtering/validating array values, andFileInputis used for checking uploaded files.The
requiredkey (line 4) tells whether the form field is required or optional. If the field is required, the site user will have to fill it in; otherwise he will receive a validation error.the
filters(line 5) andvalidators(line 8) keys may contain the configuration for zero, one, or several filters and/or validators applied to the form model's field.
 Figure 7.16. Input class inheritance
7.10.2.1. Filter Configuration
A typical filter configuration is presented below:
[
  'name' => '<filter_name>',
  'priority' => <priority>,
  'options' => [
    // Filter options go here ...
  ]
],
The name key (line 2) is the name for the filter. This may be either
a fully qualified filter class name (e.g. StringTrim::class) or an alias (e.g. StringTrim).
The optional priority key (line 3) defines filter priority in the list of filters. The priority
must be an integer number. The filters with the highest priority will be applied first. By default,
the FilterChain::DEFAULT_PRIORITY constant (value 1000) is assigned.
The options array (line 4) is specific to a certain filter and may contain
parameters for configuring the filter.
7.10.2.2. Validator Configuration
A typical validator configuration is presented below:
[
  'name' => '<validator_name>',
  'break_chain_on_failure' => <flag>,
  'options' => [
    // Validator options go here ...
  ]
],
The name key (line 2) is the name for the validator. This may be either
a fully qualified validator class name (e.g. EmailAddress::class) or an alias
(e.g. EmailAddress).
The break_chain_on_failure optional key (line 3) defines the behavior in
case the validator check fails. If this equals to true, subsequent validators
in the list will not be executed; otherwise every validator in the list will be executed
without depending on the result of other validators.
The options array (line 4) is specific to certain validator class and may contain
parameters for configuring the validator.
7.10.3. Creating Input Filter for the Contact Form
Now that you have a general idea on know how to define the input filter container
and populate it with filters and validators for each form field, let's complete
our ContactForm form model class. Below, we add the addInputFilter()
private method, which defines the filtering/validation rules and stores them in input filter container:
<?php
// ...
use Zend\InputFilter\InputFilter;

class ContactForm extends Form
{
  public function __construct()
  {
    // ... call this method to add filtering/validation rules
    $this->addInputFilter();
  }

  // ...

  // This method creates input filter (used for form filtering/validation).
  private function addInputFilter()
  {
    // Get the default input filter attached to form model.
    $inputFilter = $this->getInputFilter();

    $inputFilter->add([
        'name'     => 'email',
        'required' => true,
        'filters'  => [
           ['name' => 'StringTrim'],
        ],
        'validators' => [
           [
            'name' => 'EmailAddress',
            'options' => [
              'allow' => \Zend\Validator\Hostname::ALLOW_DNS,
              'useMxCheck' => false,
            ],
          ],
        ],
      ]
    );

    $inputFilter->add([
        'name'     => 'subject',
        'required' => true,
        'filters'  => [
           ['name' => 'StringTrim'],
           ['name' => 'StripTags'],
           ['name' => 'StripNewlines'],
        ],
        'validators' => [
           [
            'name' => 'StringLength',
              'options' => [
                'min' => 1,
                'max' => 128
              ],
           ],
        ],
      ]
    );

    $inputFilter->add([
        'name'     => 'body',
        'required' => true,
        'filters'  => [
          ['name' => 'StripTags'],
        ],
        'validators' => [
          [
            'name' => 'StringLength',
            'options' => [
              'min' => 1,
              'max' => 4096
            ],
          ],
        ],
      ]
    );
  }
}
As you can see from the code above, first we declare the alias for the
Zend\InputFilter\InputFilter class (line 3).
In the form model's constructor (line 10), we call the addInputFilter() method
which we define in lines 16-76.
The addInputFilter() method's goal is to add filtering/
validation rules to the InputFilter container (lines 21-75). For inserting filtering/validation rules into the
input filter container, we use the add() method provided by the InputFilter class, which takes the array specification
of an input to create.
We add three inputs (per each field of our form model, except its submit button):
For the
emailfield, we set therequiredflag totrueto make filling this field mandatory. We use theStringTrimfilter to remove white spaces from the beginning and the end of the E-mail address; and theEmailAddressvalidator for checking the user-entered E-mail address for correctness. We configure theEmailAddressvalidator to allow domain names as E-mail addresses (the\Zend\Validator\Hostname::ALLOW_DNSflag) and disable MX record checking (setuseMxCheckoption tofalse).For the
subjectfield, by analogy, we make it required, and use theStringTrimfilter to remove white spaces from the beginning and the end. Additionally, we use theStripNewlinesandStripTagsfilters to filter out the new line characters and HTML tags, respectively. We constrain subject string length to be between 1 and 128 characters in length by using theStringLengthvalidator.For the
bodyfield, we require it to be mandatory, and we use theStripTagsfilter to strip HTML tags from E-mail text. We also use theStringLengthvalidator to constrain E-mail text to be between 1 and 4096 characters in length.
In figure 7.17, you can find the schematic graphical representation of the input filter we've created.
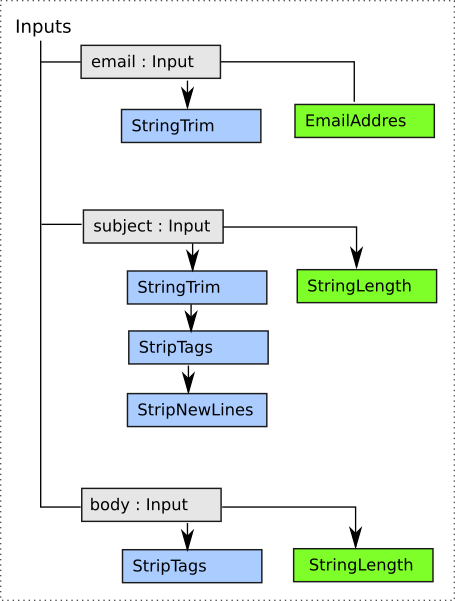 Figure 7.17. The input filter for ContactForm
Above, we briefly described how to create an input filter for the form model. For detailed information about the above mentioned (and other) filters and validators and their usage examples, please refer to Transforming Input Data with Filters and Checking Input Data with Validators.