


7.2. About HTML Forms
Form functionality provided by Zend Framework 3 internally uses HTML forms. Because of that, we start with a brief introduction to HTML forms topic.
In HTML, forms are enclosed with <form> and </form> tags. A form typically
consists of fields: text input fields, check boxes, radio buttons, submit buttons,
hidden fields and so on. HTML provides several tags intended for defining form
fields:
<input>- specifies an input field where the user can enter some data (field appearance and behavior depends on the field type);<textarea>- multi-line text area which can contain an unlimited number of characters;<button>- a clickable button19;<select>- a dropdown list;<option>- used inside the<select>element for defining the available options in a dropdown list.
19) The <button> field is analogous to <input type="button">, however it
provides additional capabilities, like specifying a graphical icon on the button.
In table 7.1, you can find examples of HTML form field definitions. Figure 7.1 contains corresponding field visualizations (except the "hidden" field type, which has no visual representation).
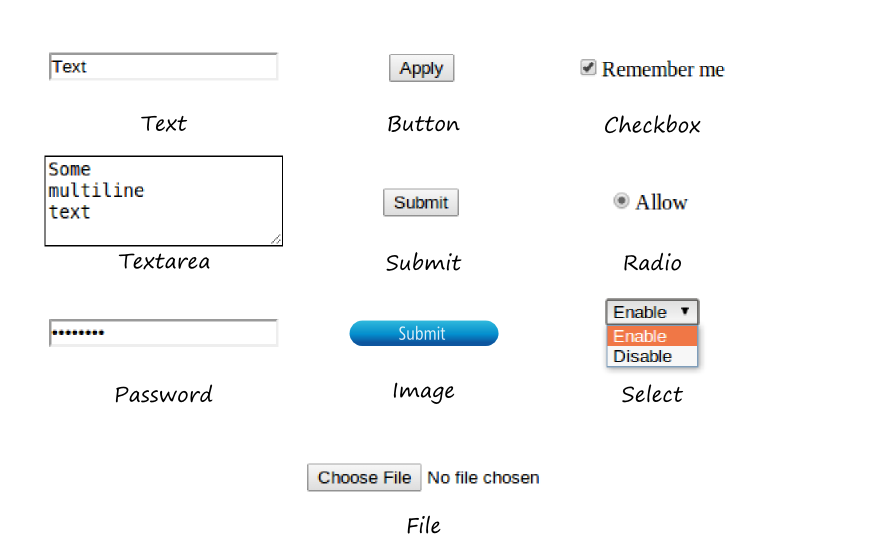 Figure 7.1. Standard HTML form fields
| Field | Definition |
|---|---|
| Text input field | <input type="text"> |
| Text area | <textarea rows=4></textarea> |
| Password | <input type="password"> |
| Button | <input type="button" value="Apply"> or <button type="button">Apply</button> |
| Submit button | <input type="submit" value="Submit"> |
| Image (graphical submit button) | <input type="image" src="button.jpg"> |
| Reset button | <input type="reset" value="Reset"> |
| Checkbox | <input type="checkbox">Remember me</input> |
| Radio | <input type="radio" value="Radio">Allow</input> |
| Select | <select><option>Enable</option><option>Disable</option></select> |
| File | <input type="file"> |
| Hidden field | <input type="hidden"> |
HTML5 introduced several new form field types (listed in table 7.2); figure 7.2 contains corresponding field visualizations.
HTML5 fields provide more convenient ways for entering the most frequently used data types: numbers, dates, E-mails, URLs, etc. Additionally, on form submit, the web browser validates that the user entered data is in a correct format, and if not the browser will prevent form submission and ask the user to correct the input error.
| Field | Definition |
|---|---|
| Color picker | <input type="color"> |
| Date | <input type="date"> |
| Date-time (with time zone) | <input type="datetime"> |
| Date-time (without time zone) | <input type="datetime-local"> |
| E-mail address | <input type="email"> |
| Number | <input type="number"> |
| Time | <input type="time"> |
| Month | <input type="month"> |
| Week | <input type="week"> |
| URL | <input type="url"> |
| Range (slider) | <input type="range"> |
| Search field | <input type="search" name="googlesearch"> |
| Telephone number | <input type="tel"> |
 Figure 7.2. HTML5 form fields
7.2.1. Fieldsets
You can group related form fields with the help of the <fieldset> tag, as shown in the
example below. The optional <legend> tag allows you to define the caption for the group.
<fieldset>
  <legend>Choose a payment method:</legend>
  <input type="radio" name="payment" value="paypal">PayPal</input>
  <input type="radio" name="payment" value="card">Credit Card</input>
</fieldset>
The HTML markup presented above will generate the group as in figure 7.3:
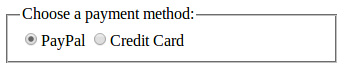 Figure 7.3. Fieldset
7.2.2. Example: "Contact Us" Form
An example of a typical HTML form is presented below:
<form name="contact-form" action="/contactus" method="post">
  <label for="email">E-mail</label>
  <input name="email" type="text">
  <br>
  <label for="subject">Subject</label>
  <input name="subject" type="text">
  <br>
  <label for="body">Message</label>
  <textarea name="body" class="form-control" rows="6"></textarea>
  <br>
  <input name="submit" type="submit" value="Submit">
</form>
In the example above, we have the feedback form which allows the
user to enter his E-mail address, message subject, and text, and then submit them to the server. The
form definition begins with the <form> tag (line 1).
The <form> tag contains several important attributes:
- the
nameattribute specifies the name of the form ("contact-form"). - the
actionattribute defines the URL of the server-side script which is responsible for processing the submitted form ("/contactus"). - the
methodattribute defines the method (either GET or POST) to use for delivering form data. In this example, we use the POST method (recommended).
In line 3, we define a text input field with the help of the <input> element. The name attribute
specifies the name of the field ("email"). The type attribute
specifies the purpose of the element (the type "text" means the input field is intended for
entering text).
In line 2, we have the <label> element which represents the label for the E-mail
text input field (the corresponding input field's name is determined by the for
attribute of the <label> element).
In lines 5-6, by analogy, we have the "Subject" input field and its label.
In line 9, we have the text area field which is suited well for entering
multi-line text. The height of the text area (6 rows) is defined by the rows
attribute.
In line 11, we have the submit button (input element with "submit" type).
The value attribute allows you to set the title text for the button ("Submit").
By clicking this button, the user will send the form data to the server.
Line break <br> elements are used in lines 4, 7 and 10 to position
form controls one below another (otherwise they would be positioned in
one line).
To see what this form looks like, you can put its HTML markup code in a .html file
and open the file in your browser. You will see the form visualization
as in figure 7.4.
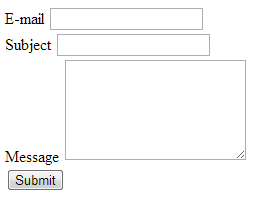 Figure 7.4. Visualization of the feedback form
If you enter some data in the feedback form and click the Submit button, the web browser will
send an HTTP request to the URL you specified in the action attribute of the form.
The HTTP request will contain the data you entered.
7.2.3. GET and POST Methods
HTML forms support GET and POST methods for submitting the data to server. These methods have important technical differences.
When using POST method for submitting the form, the data is sent in HTTP request body. For example, when you press the Submit button on the feedback form, an HTTP request will look like the example below:
POST http://localhost/contactus HTTP/1.1
Host: localhost
Connection: keep-alive
Content-Length: 76
Accept: text/html,application/xhtml+xml,application/xml
Origin: null
User-Agent: Mozilla/5.0 (Windows NT 6.1; WOW64)
Content-Type: application/x-www-form-urlencoded

email=name%40example.com&subject=Example+Subject&body=Hello%21&submit=Submit
Above, you can see that the form data is transmitted in request body (line 10). Form fields are concatenated in a single string and then URL-encoded to replace unsafe characters with allowed characters from the ASCII table.
In comparison, when you set the GET method for the form, an HTTP request will look like the example below:
GET http://localhost/contactus?email=name%40example.com&subject=Example+Subject&body=Hello%21&submit=Submit HTTP/1.1
Host: localhost
Connection: keep-alive
Accept: text/html,application/xhtml+xml,application/xml
User-Agent: Mozilla/5.0 (Windows NT 6.1; WOW64)
Accept-Encoding: gzip,deflate,sdch
In the example above, you can see that the form data is concatenated, URL-encoded and sent as part of the HTTP request's URL (line 1), which makes the URL long and harder to read. Since the form data is sent inside the URL, this makes it easily visible to site visitors.
In most cases, you will use the POST method for delivering form data in the request body, because the user doesn't need to see the data in the browser's navigation bar (especially when submitting passwords or other sensitive data).
Please note that submitting form data using the POST method does not protect your sensitive data (like passwords, credit card numbers, etc.) from being stolen. To protect such data, you'll have to direct your HTTP traffic to an SSL tunnel (SSL stands for Secure Sockets Layer). Protected SSL connections are distinguished by using the https:// schema in web page URLs. To enable SSL for your Apache HTTP server, you will need to obtain an SSL certificate from a trusted provider (like VeriSign) and install it on your server.