


Installing Apache, PHP and MySQL in Linux
In general, it is recommended that you use a popular and well supported Linux distribution, either 32-bit (x86) or 64-bit (amd64). A 64-bit version can give a great performance, but deliver more problems (like driver compatibility issues). 32-bit systems are with us for a longer time and have less problems, which is important for novice users.
There are two big families of Linux distributions: Debian and Red Hat. Debian is a free and open-source project, which has several branches, the most popular of which is Linux Ubuntu. Red Hat is a commercially distributed operating system, which has "free" branches named Linux CentOS and Linux Fedora.
Red Hat Linux is being developed by Red Hat Inc. Red Hat Linux (or its "free" modification CentOS) is known as a "corporate" operating system. Its main advantage is "stability" (low rate of system crashes). However, this stability is achieved through carefully choosing the software which is installed out of the box. When you install such an operating system for the purpose of PHP development, this "stability" may become a problem, because you have access to some old (but "stable") version of PHP and other software. They do not include a new "bleeding-edge" software into their repository, so if you want to install one, you will need to download it from somewhere, read the manual, and possibly (if you are not lucky) compile it yourself.
There is another Linux distribution, which, in the author's opinion, suits better for PHP development. Its name is Linux Ubuntu. Ubuntu is being developed by Canonical Ltd. Linux Ubuntu has two editions: Desktop edition and Server edition. Ubuntu Desktop is a distribution containing graphics environment, while Ubuntu Server edition has console terminal only. For the purpose of PHP development, it is recommended to use the Desktop edition.
Canonical typically releases a new version of Linux Ubuntu each 6 months, in April and October, and a "long term support" (LTS) version each 2 years. For example, at the moment of writing this text, the latest version is Ubuntu 16.04 Xenial Xerus LTS (released in April 2016).
Non-LTS releases have short support period (about 9 months), but they have the newest versions of the PHP software out of the box. On the other hand, LTS releases have longer support period (5 years), but a little outdated PHP software out of the box.
For PHP development, the author would recommend to use the latest version of Ubuntu Desktop, because it has the newest version of PHP and other software available from repository. The disadvantage of using such a version is that you will need to upgrade it to the next release every 9 months (as support period expires). If you don't like the perspective of upgrading every 9 months, choose the latest LTS release.
For your information, table A.1 lists PHP versions available for installation from repository in different Linux distributions:
| Linux Distribution | PHP Version |
|---|---|
| Linux Ubuntu 16.04 Xenial Xerus LTS | 7.0 |
| Linux Ubuntu 15.10 Wily Werewolf | 5.6 |
| Linux Ubuntu 15.04 Vivid Vervet | 5.6 |
| Linux Ubuntu 14.10 Utopic Unicorn | 5.5 |
| Linux Ubuntu 14.04 Trusty Tahr | 5.5 |
As you can see from the table above, for the purpose of ZF3 development, you'll have to install Ubuntu 15.04 or later.
When choosing between 32-bit and 64-bit versions of the system, remember that the 64 bit version of Linux Ubuntu will have more compatibility issues than its 32-bit counterpart. The support of drivers can also cause problems on the 64-bit platform.
If you are new to Linux Ubuntu, watch these excellent video tutorials by LearnLinux.tv YouTube user: Tutorial - Installing Ubuntu 16.04 LTS (this one shows how to install Ubuntu Desktop Edition) and Tutorial - Installing Ubuntu Server 16.04 (this one shows how to install Ubuntu Server Edition which has console terminal only).
Installing Apache and PHP
In modern Linux distributions, you can easily download and install
software from a centralized repository. The repository contains so called
packages. A package has a name (for example, php, apache2), and a version.
In general you can install a package with a single command. However the command (and a package name) may differ based on linux distribution you use. For example, to download and install packages in Debian-based Linux distributions (e.g. Ubuntu Linux), you use Advanced Packaging Tool (APT). In Red Hat provided distributions (e.g. Fedora or CentOS), you use YUM (RPM package manager). Below, detailed installation instructions for these operating systems are provided.
Debian or Linux Ubuntu
First of all, it is recommended that you update your system by installing the latest available updates. To do this, from a command shell, run the following commands:
sudo apt-get update

sudo apt-get upgrade
The commands above run the APT tool and install the newest system packages updates.
The sudo command (stands for "Super User DO") allows to run another command,
apt-get in our case, as system administrator (root). You typically use sudo when you
need to elevate your privileges to install a package or edit some configuration file.
The
sudocommand may request you for password. When prompted, enter the password under which you log into the system and press Enter.
Next, from a command shell, run the following commands:
sudo apt-get install apache2

sudo apt-get install php

sudo apt-get install libapache2-mod-php
The commands above download from repository and install the latest available versions of Apache HTTP Server, PHP engine and PHP extension module for Apache.
The commands above may ask you for confirmation when installing a package. It is recommended to answer Yes (press "y" and then press Enter).
Fedora, CentOS or Red Hat Linux
First of all, it is recommended that you update your system by installing the latest available updates. To do this, from a command shell, run the following command:
sudo yum update
The command above runs the YUM tool and installs the newest system package updates.
Next, from a command shell, run the following commands:
sudo yum install httpd

sudo yum install php
The commands above download from repository and install the latest available versions of Apache HTTP Server and PHP engine.
Next, run the following commands to add Apache HTTP Server to system autorun and start it:
sudo chkconfig --level 235 httpd on

sudo service httpd start
Checking Web Server Installation
After you set up your Apache HTTP web server, check that it is installed correctly and that the server sees the PHP engine. To do that, create phpinfo.php file in Apache document root directory.
The document root is a directory where you can (by default) store the web files. Typically, the Apache document root directory is /var/www/html.
To be able to navigate the directory structure and edit files, it is recommended to install Midnight Commander (convenient file manager and text editor). To install Midnight Commander in Debian or Linux Ubuntu, type the following:
sudo apt-get install mcThe following command installs Midnight Commander in Fedora, CentOS or Red Hat Linux:
sudo yum install mcAfter installation, you can launch the file manager with the
mccommand, and edit a text file with the command like this:
mcedit /path/to/fileIf you need administrative permissions to edit the file, prepend the
sudocommand to the command above.
In the phpinfo.php file, enter the PHP method phpinfo() as follows:
<?php
  phpinfo();
?>
Open the file in your web browser. The standard PHP information page should display (see figure A.1 for example).
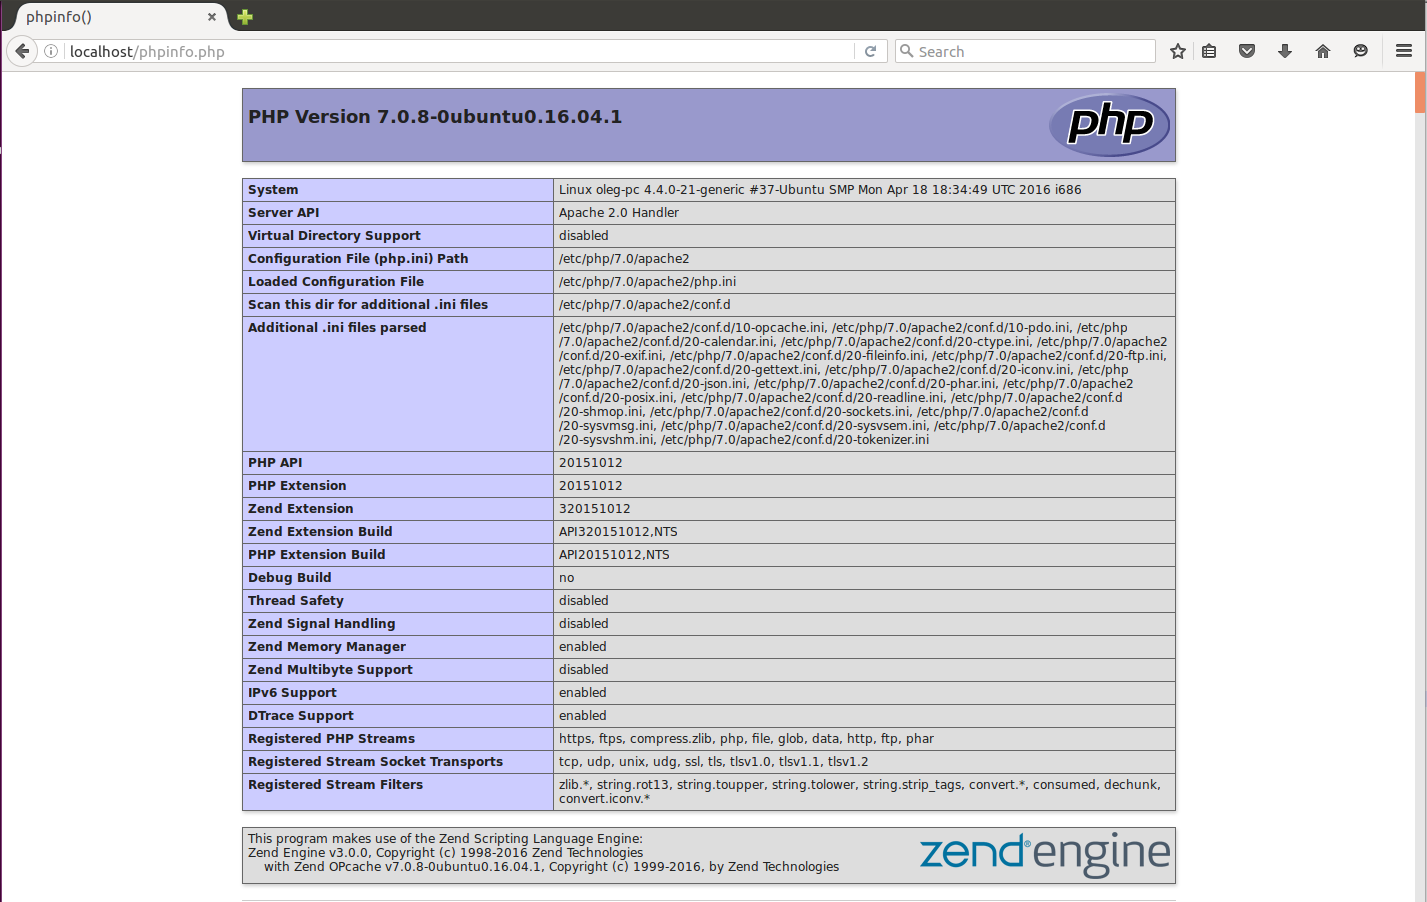 Figure A.1. PHP Information
Editing PHP Configuration
To configure PHP for your development environment, you need to edit the PHP config file (php.ini) and adjust some parameters.
In different distributions of Linux, PHP configuration file can be located in different paths. To edit the PHP config file in Debian or Linux Ubuntu, type the following:
sudo mcedit /etc/php/7.0/apache2/php.iniType the following to edit php.ini in Fedora, CentOS or Red Hat Linux:
sudo mcedit /etc/php.ini
For the development environment, it is recommended to set the following error handling and logging parameters as below. This will force PHP to display errors on your PHP pages to screen.
error_reporting = E_ALL
display_errors = On
display_startup_errors = On
To conveniently search within the file, press
F7in Midnight Commander's editor window and enter the search string (the name of the parameter to search for).
Set your time zone settings (replace <your_time_zone> placeholder with your time zone,
for example, UTC or America/New_York):
date.timezone = <your_time_zone>
Set max_execution_time, upload_max_filesize and post_max_size parameters
to allow large file uploads through POST. For example, setting upload_max_filesize with 128M
allows to upload files up to 128 megabytes in size. Setting max_execution_time with zero allows to execute
the PHP script indefinitely long.
max_execution_time = 0
post_max_size = 128M
upload_max_filesize = 128M
When ready, save your changes by pressing the F2 key and then press F10 to exit from Midnight Commander's editor.
Restarting Apache Web Server
After editing configuration files, you usually have to restart Apache HTTP Server to apply your changes. You do this with the following command (in Debian or Linux Ubuntu):
sudo service apache2 restart
or the following (in Fedora, CentOS or Red Hat):
sudo service httpd restart
Enabling Apache's mod_rewrite module
Zend Framework 3 requires that you have Apache's mod_rewrite module enabled. The mod_rewrite module is used to rewrite requested URLs based on some rules, redirecting site users to another URL.
In Debian or Ubuntu Linux
To enable Apache mod_rewrite module, type the following command:
a2enmod rewrite
Finally, restart Apache web server to apply your changes.
In Fedora, CentOS or Red Hat Linux
In these Linux distributions, mod_rewrite is enabled by default, so you don't need to do
anything.
Creating Apache Virtual Host
Zend Framework 3 requires that you create a virtual host for your web site. A virtual host term means that you can run several web-sites on the same machine.
The virtual sites are differentiated by domain name (like site.mydomain.com and site2.mydomain.com). Each virtual host has its own document root directory, allowing you to place your web files anywhere on the system (not only to /var/www/html directory).
Please note that right now you don't need to create a virtual host, we'll do that in chapter Zend Skeleton Application. Now you just need to have an idea of how virtual hosts are created in different Linux distributions.
In Debian or Ubuntu Linux
You have an example default virtual host at /etc/apache2/sites-available/000-default.conf (see below).
<VirtualHost *:80>
	# The ServerName directive sets the request scheme, hostname and port that
	# the server uses to identify itself. This is used when creating
	# redirection URLs. In the context of virtual hosts, the ServerName
	# specifies what hostname must appear in the request's Host: header to
	# match this virtual host. For the default virtual host (this file) this
	# value is not decisive as it is used as a last resort host regardless.
	# However, you must set it for any further virtual host explicitly.
	#ServerName www.example.com

	ServerAdmin webmaster@localhost
	DocumentRoot /var/www/html

	# Available loglevels: trace8, ..., trace1, debug, info, notice, warn,
	# error, crit, alert, emerg.
	# It is also possible to configure the loglevel for particular
	# modules, e.g.
	#LogLevel info ssl:warn

	ErrorLog ${APACHE_LOG_DIR}/error.log
	CustomLog ${APACHE_LOG_DIR}/access.log combined

	# For most configuration files from conf-available/, which are
	# enabled or disabled at a global level, it is possible to
	# include a line for only one particular virtual host. For example the
	# following line enables the CGI configuration for this host only
	# after it has been globally disabled with "a2disconf".
	#Include conf-available/serve-cgi-bin.conf
</VirtualHost>

# vim: syntax=apache ts=4 sw=4 sts=4 sr noet
All you have to do is just to edit this virtual host file when needed and restart Apache to apply changes.
You can also copy this file and create another virtual host, when you need several web sites to operate on the same machine. For example, to create another virtual host file named 001-vhost2.conf , type the following from your command shell:
cd /etc/apache2/sites-available
sudo cp 000-default.conf 001-vhost2.conf
sudo a2ensite 001-vhost2.conf
The virtual host's name starts with a prefix (like 000, 010, etc.), which defines the priority. Apache web server tries to direct an HTTP request to each virtual host in turn (first to 000-default, then to 001-vhost2), and if a certain virtual host cannot serve the request, the next one is tried and so on.
In Fedora, CentOS or Red Hat Linux
There is an example virtual host in /etc/httpd/conf/httpd.conf file. Scroll down to the very bottom of the document to the section called Virtual Hosts. You can edit this section as you need and restart Apache to apply your changes.
Installing XDebug PHP extension
To be able to debug your web sites, it is recommended that you install the XDebug extension. The XDebug extension allows to look inside a running program, see the variables passed from the client, walk the call stack and profile your PHP code. XDebug also provides the code coverage analysis capabilities, which are useful when you write unit tests for your code.
In Debian or Ubuntu Linux
To install XDebug, simply type the following command:
sudo apt-get install php-xdebug
Then edit the /etc/php/7.0/mods-available/xdebug.ini file by typing the following:
sudo mcedit /etc/php/7.0/mods-available/xdebug.ini
Add the following lines to the end of file (replace the remote IP address placeholder with the IP address you plan to debug your website from):
xdebug.remote_enable=1
xdebug.remote_handler=dbgp
xdebug.remote_mode=req
xdebug.remote_host=<remote_ip_address>
Finally, restart the Apache server to apply your changes. Then open the phpinfo.php in your browser and look for XDebug section (it should look like in the figure A.2):
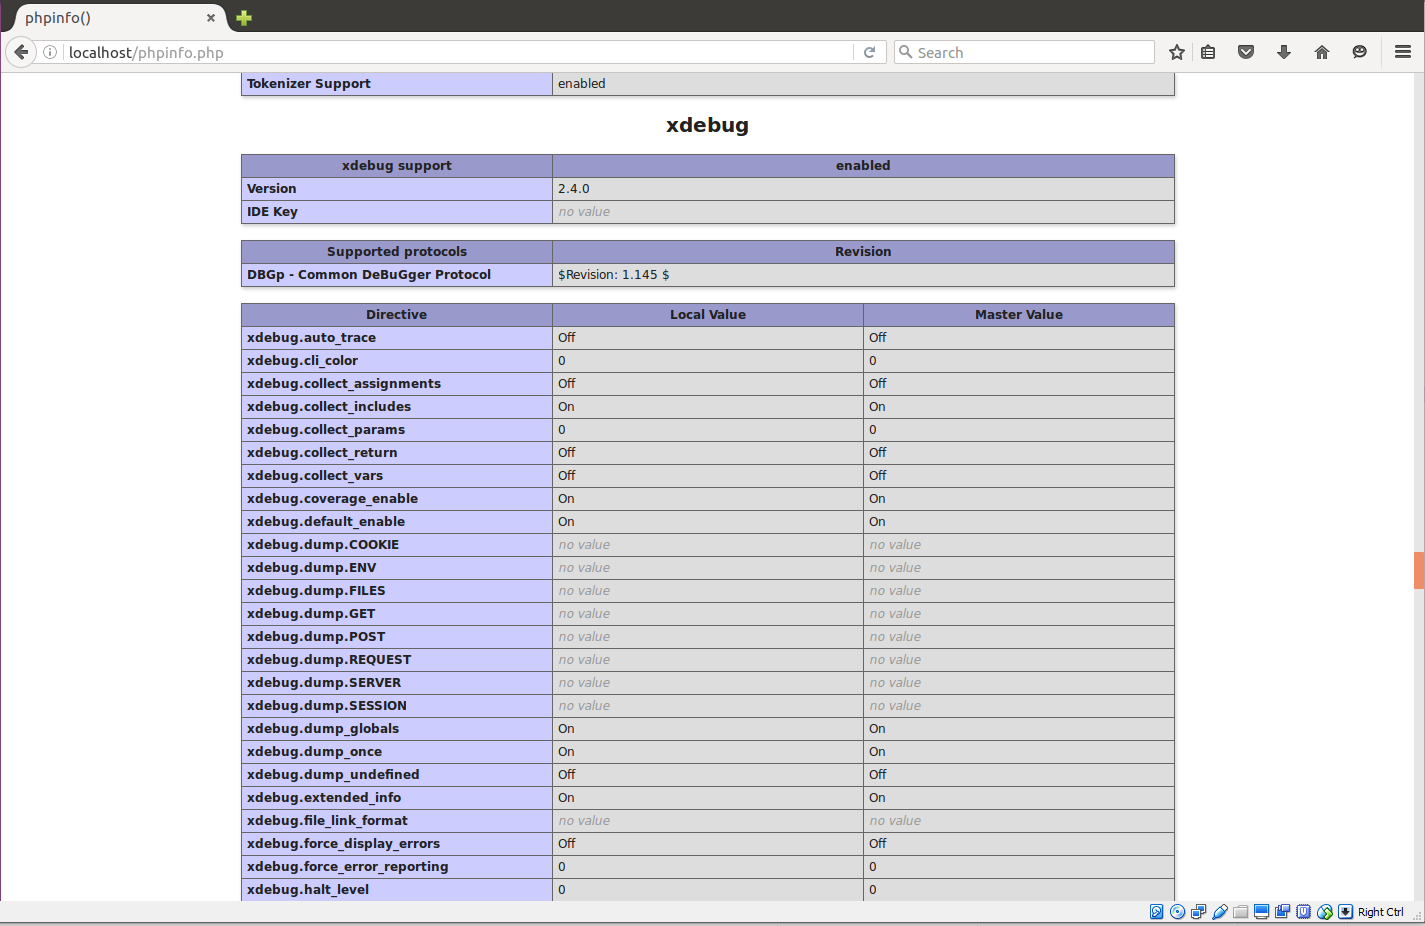 Figure A.2. XDebug Information
In Fedora, CentOS or Red Hat Linux
In these Linux distributions, installing XDebug is a little more difficult. Install XDebug package with the following command:
yum install php-pecl-xdebug
After install, it is required to create the file xdebug.ini in /etc/php.d directory:
mcedit /etc/php.d/xdebug.ini
Add the following lines to the end of file (replace the remote IP address placeholder with the IP address you plan to debug your website from):
[xdebug]

zend_extension = /usr/lib/php/modules/xdebug.so
xdebug.remote_enable=1
xdebug.remote_handler=dbgp
xdebug.remote_mode=req
xdebug.remote_host=<remote_ip_address>
xdebug.remote_port=9000
Restart the Apache web server to apply your changes. Then check the phpinfo.php in your browser. If installation was successfull, you'll see some XDebug-related information.
Installing MySQL Database Server
MySQL is a free relational database management system being developed and supported by Oracle. MySQL is the most popular database system used with PHP. In this book, we will be using MySQL.
Debian or Linux Ubuntu
In order to install MySQL database, type the following:
sudo apt-get install mysql-server

sudo apt-get install mysql-client

sudo apt-get install php-mysql
The commands above install MySQL server component, MySQL client component and MySQL extension module for PHP, respectively.
Fedora, CentOS or Red Hat Linux
In order to install MySQL database, type the following:
sudo yum install mysql-server

sudo yum install mysql

sudo yum install php-mysql
The commands above install MySQL server component, MySQL client component and MySQL extension module for PHP, respectively.
Run the following commands to add MySQL server to autostart and start the server:
sudo chkconfig --level 235 mysqld on

sudo service mysqld start
Configuring the MySQL Database Server
During the installation of the MySQL server, a root user is created. By default the root user has no password, so you have to set it manually. You will need that password for creating other MySQL database users.
To connect to the MySQL server enter the following command:
mysql -u root -p
The MySQL command prompt will appear. In the command prompt
enter the following command and press Enter (in the command
below, replace the <your_password> placeholder with some password):
SET PASSWORD FOR 'root'@'localhost' = '<insert_your_password>';
If the command is executed successfully, the following message is displayed:
Query OK, 0 rows affected (0.00 sec)
Now we need to create a new database that will store the tables. To do this, type the following:
CREATE DATABASE test_db;
The command above creates empty schema that we will populate later.
Next, we want to create another database user named test_user that
will be used by the ZF3-based web site for connecting to the database.
To create the user, type the following (in the command below,
replace the <insert_your_password> placeholder with some password):
GRANT ALL PRIVILEGES ON test_db.* TO 'test_user'@'localhost' IDENTIFIED BY '<insert_your_password>';
The command above creates the user named 'test_user' and grants the user all privileges on the 'test_db' database.
Finally, type quit to exit the MySQL prompt.