11.3. Implementar formulario multi-pasos
En esta sección mostraremos como implementar un formulario multi-pasos con ZF3. Un formulario multi-pasos es un formulario que tiene muchos campos y que se muestra en varios pasos. Para guardar el paso actual y los datos ingresados por el usuario entre las peticiones a las páginas se utilizan las sesiones de PHP.
Por ejemplo, el registro del usuario se puede ejecutar en varios pasos: en el primer paso mostramos la página que permite ingresar el nombre de usuario y contraseña, en el segundo paso mostramos la página donde el visitante del sitio puede ingresar su información personal y en el tercer paso ingresar la información de facturación.
Otro ejemplo de formulario multi-pasos es un formulario de Encuesta. Este formulario podría mostrar una pregunta y posibles variantes de su respuesta. Este formulario tendría tantos paso como preguntas tiene la encuesta.
En esta sección implementaremos el formulario Registro de Usuario que permite recolectar información sobre el usuario que se está registrando.
Podemos ver este ejemplo funcionando completamente en la aplicación web de ejemplo Form Demo que se distribuye junto a este libro.
11.3.1. Habilitar sesiones
Si somos nuevos en las características de sesión de PHP podemos revisar Trabajar con sesiones antes de leer esta sección.
El soporte para sesiones se implementa en el componente Zend\Session, por lo
que debemos instalarlo si aún no lo hemos hecho antes.
Primero, modificamos el archivo de configuración APP_DIR/config/global.php de la siguiente manera:
<?php
use Zend\Session\Storage\SessionArrayStorage;
use Zend\Session\Validator\RemoteAddr;
use Zend\Session\Validator\HttpUserAgent;

return [
    // Session configuration.
    'session_config' => [
        // Session cookie will expire in 1 hour.
        'cookie_lifetime' => 60*60*1,
        // Store session data on server maximum for 30 days.
        'gc_maxlifetime'  => 60*60*24*30,
    ],
    // Session manager configuration.
    'session_manager' => [
        // Session validators (used for security).
        'validators' => [
            RemoteAddr::class,
            HttpUserAgent::class,
        ]
    ],
    // Session storage configuration.
    'session_storage' => [
        'type' => SessionArrayStorage::class
    ],

    // ...
];
Luego, agregamos las siguientes líneas al archivo module.config.php para registrar el contenedor de sesión UserRegistration:
<?php
return [
    // ...
    'session_containers' => [
        'UserRegistration'
    ],
];
¡Listo! Ahora podemos usar el contenedor de sesión en nuestro código. Luego,
implementaremos el modelo de formulario RegistrationForm.
11.3.2. Agregar la clase RegistrationForm
El modelo de formulario RegistrationForm se usará para colectar los datos
sobre el usuario (correo electrónico, nombre completo, contraseña, información
personal e información de facturación). Agregaremos elementos a este formulario
en tres pedazos para permitir usarlo como un formulario de multiples-pasos.
Para agregar el modelo de formulario, creamos el archivo RegistrationForm.php en la carpeta Form que está dentro de la carpeta fuente del módulo Application:
<?php
namespace Application\Form;
use Zend\Form\Form;
use Zend\InputFilter\InputFilter;
use Application\Validator\PhoneValidator;
/**
* This form is used to collect user registration data. This form is multi-step.
* It determines which fields to create based on the $step argument you pass to
* its constructor.
*/
class RegistrationForm extends Form
{
/**
* Constructor.
*/
public function __construct($step)
{
// Check input.
if (!is_int($step) || $step<1 || $step>3)
throw new \Exception('Step is invalid');
// Define form name
parent::__construct('registration-form');
// Set POST method for this form
$this->setAttribute('method', 'post');
$this->addElements($step);
$this->addInputFilter($step);
}
/**
* This method adds elements to form (input fields and submit button).
*/
protected function addElements($step)
{
if ($step==1) {
// Add "email" field
$this->add([
'type' => 'text',
'name' => 'email',
'attributes' => [
'id' => 'email'
],
'options' => [
'label' => 'Your E-mail',
],
]);
// Add "full_name" field
$this->add([
'type' => 'text',
'name' => 'full_name',
'attributes' => [
'id' => 'full_name'
],
'options' => [
'label' => 'Full Name',
],
]);
// Add "password" field
$this->add([
'type' => 'password',
'name' => 'password',
'attributes' => [
'id' => 'password'
],
'options' => [
'label' => 'Choose Password',
],
]);
// Add "confirm_password" field
$this->add([
'type' => 'password',
'name' => 'confirm_password',
'attributes' => [
'id' => 'confirm_password'
],
'options' => [
'label' => 'Type Password Again',
],
]);
} else if ($step==2) {
// Add "phone" field
$this->add([
'type' => 'text',
'name' => 'phone',
'attributes' => [
'id' => 'phone'
],
'options' => [
'label' => 'Mobile Phone',
],
]);
// Add "street_address" field
$this->add([
'type' => 'text',
'name' => 'street_address',
'attributes' => [
'id' => 'street_address'
],
'options' => [
'label' => 'Street address',
],
]);
// Add "city" field
$this->add([
'type' => 'text',
'name' => 'city',
'attributes' => [
'id' => 'city'
],
'options' => [
'label' => 'City',
],
]);
// Add "state" field
$this->add([
'type' => 'text',
'name' => 'state',
'attributes' => [
'id' => 'state'
],
'options' => [
'label' => 'State',
],
]);
// Add "post_code" field
$this->add([
'type' => 'text',
'name' => 'post_code',
'attributes' => [
'id' => 'post_code'
],
'options' => [
'label' => 'Post Code',
],
]);
// Add "country" field
$this->add([
'type' => 'select',
'name' => 'country',
'attributes' => [
'id' => 'country',
],
'options' => [
'label' => 'Country',
'empty_option' => '-- Please select --',
'value_options' => [
'US' => 'United States',
'CA' => 'Canada',
'BR' => 'Brazil',
'GB' => 'Great Britain',
'FR' => 'France',
'IT' => 'Italy',
'DE' => 'Germany',
'RU' => 'Russia',
'IN' => 'India',
'CN' => 'China',
'AU' => 'Australia',
'JP' => 'Japan'
],
],
]);
} else if ($step==3) {
// Add "billing_plan" field
$this->add([
'type' => 'select',
'name' => 'billing_plan',
'attributes' => [
'id' => 'billing_plan',
],
'options' => [
'label' => 'Billing Plan',
'empty_option' => '-- Please select --',
'value_options' => [
'Free' => 'Free',
'Bronze' => 'Bronze',
'Silver' => 'Silver',
'Gold' => 'Gold',
'Platinum' => 'Platinum'
],
],
]);
// Add "payment_method" field
$this->add([
'type' => 'select',
'name' => 'payment_method',
'attributes' => [
'id' => 'payment_method',
],
'options' => [
'label' => 'Payment Method',
'empty_option' => '-- Please select --',
'value_options' => [
'Visa' => 'Visa',
'MasterCard' => 'Master Card',
'PayPal' => 'PayPal'
],
],
]);
}
// Add the CSRF field
$this->add([
'type' => 'csrf',
'name' => 'csrf',
'attributes' => [],
'options' => [
'csrf_options' => [
'timeout' => 600
]
],
]);
// Add the submit button
$this->add([
'type' => 'submit',
'name' => 'submit',
'attributes' => [
'value' => 'Next Step',
'id' => 'submitbutton',
],
]);
}
/**
* This method creates input filter (used for form filtering/validation).
*/
private function addInputFilter($step)
{
$inputFilter = new InputFilter();
$this->setInputFilter($inputFilter);
if ($step==1) {
$inputFilter->add([
'name' => 'email',
'required' => true,
'filters' => [
['name' => 'StringTrim'],
],
'validators' => [
[
'name' => 'EmailAddress',
'options' => [
'allow' => \Zend\Validator\Hostname::ALLOW_DNS,
'useMxCheck' => false,
],
],
],
]);
$inputFilter->add([
'name' => 'full_name',
'required' => true,
'filters' => [
['name' => 'StringTrim'],
['name' => 'StripTags'],
['name' => 'StripNewlines'],
],
'validators' => [
[
'name' => 'StringLength',
'options' => [
'min' => 1,
'max' => 128
],
],
],
]);
// Add input for "password" field
$inputFilter->add([
'name' => 'password',
'required' => true,
'filters' => [
],
'validators' => [
[
'name' => 'StringLength',
'options' => [
'min' => 6,
'max' => 64
],
],
],
]);
// Add input for "confirm_password" field
$inputFilter->add([
'name' => 'confirm_password',
'required' => true,
'filters' => [
],
'validators' => [
[
'name' => 'Identical',
'options' => [
'token' => 'password',
],
],
],
]);
} else if ($step==2) {
$inputFilter->add([
'name' => 'phone',
'required' => true,
'filters' => [
],
'validators' => [
[
'name' => 'StringLength',
'options' => [
'min' => 3,
'max' => 32
],
],
[
'name' => PhoneValidator::class,
'options' => [
'format' => PhoneValidator::PHONE_FORMAT_INTL
]
],
],
]);
// Add input for "street_address" field
$inputFilter->add([
'name' => 'street_address',
'required' => true,
'filters' => [
['name' => 'StringTrim'],
],
'validators' => [
['name'=>'StringLength', 'options'=>['min'=>1, 'max'=>255]]
],
]);
// Add input for "city" field
$inputFilter->add([
'name' => 'city',
'required' => true,
'filters' => [
['name' => 'StringTrim'],
],
'validators' => [
['name'=>'StringLength', 'options'=>['min'=>1, 'max'=>255]]
],
]);
// Add input for "state" field
$inputFilter->add([
'name' => 'state',
'required' => true,
'filters' => [
['name' => 'StringTrim'],
],
'validators' => [
['name'=>'StringLength', 'options'=>['min'=>1, 'max'=>32]]
],
]);
// Add input for "post_code" field
$inputFilter->add([
'name' => 'post_code',
'required' => true,
'filters' => [
],
'validators' => [
['name' => 'IsInt'],
['name'=>'Between', 'options'=>['min'=>0, 'max'=>999999]]
],
]);
// Add input for "country" field
$inputFilter->add([
'name' => 'country',
'required' => false,
'filters' => [
['name' => 'Alpha'],
['name' => 'StringTrim'],
['name' => 'StringToUpper'],
],
'validators' => [
['name'=>'StringLength', 'options'=>['min'=>2, 'max'=>2]]
],
]);
} else if ($step==3) {
// Add input for "billing_plan" field
$inputFilter->add([
'name' => 'billing_plan',
'required' => true,
'filters' => [
],
'validators' => [
[
'name' => 'InArray',
'options' => [
'haystack'=>[
'Free',
'Bronze',
'Silver',
'Gold',
'Platinum'
]
]
]
],
]);
// Add input for "payment_method" field
$inputFilter->add([
'name' => 'payment_method',
'required' => true,
'filters' => [
],
'validators' => [
[
'name' => 'InArray',
'options' => [
'haystack'=>[
'PayPal',
'Visa',
'MasterCard',
]
]
]
],
]);
}
}
}
Como podemos ver en el código de arriba, la clase RegistrationForm es un
modelo de formulario usual pero acepta un argumento $step en su constructor que
permite especificar cuales elementos del formulario usar en el paso actual.
11.3.3. Agregar la clase RegistrationController
Luego, agregaremos la clase controladora RegistrationController. Para hacer
esto, creamos el archivo RegistrationController.php dentro de la carpeta
Controller y agregamos las siguientes líneas de código:
<?php
namespace Application\Controller;

use Zend\Mvc\Controller\AbstractActionController;
use Zend\View\Model\ViewModel;
use Application\Form\RegistrationForm;
use Zend\Session\Container;

/**
 * This is the controller class displaying a page with the User Registration form.
 * User registration has several steps, so we display different form elements on
 * each step. We use session container to remember user's choices on the previous
 * steps.
 */
class RegistrationController extends AbstractActionController
{
    /**
     * Session container.
     * @var Zend\Session\Container
     */
    private $sessionContainer;

    /**
     * Constructor. Its goal is to inject dependencies into controller.
     */
    public function __construct($sessionContainer)
    {
        $this->sessionContainer = $sessionContainer;
    }

    /**
     * This is the default "index" action of the controller. It displays the
     * User Registration page.
     */
    public function indexAction()
    {
        // Determine the current step.
        $step = 1;
        if (isset($this->sessionContainer->step)) {
            $step = $this->sessionContainer->step;
        }

        // Ensure the step is correct (between 1 and 3).
        if ($step<1 || $step>3)
            $step = 1;

        if ($step==1) {
            // Init user choices.
            $this->sessionContainer->userChoices = [];
        }

        $form = new RegistrationForm($step);

        // Check if user has submitted the form
        if($this->getRequest()->isPost()) {

            // Fill in the form with POST data
            $data = $this->params()->fromPost();

            $form->setData($data);

            // Validate form
            if($form->isValid()) {

                // Get filtered and validated data
                $data = $form->getData();

                // Save user choices in session.
                $this->sessionContainer->userChoices["step$step"] = $data;

                // Increase step
                $step ++;
                $this->sessionContainer->step = $step;

                // If we completed all 3 steps, redirect to Review page.
                if ($step>3) {
                    return $this->redirect()->toRoute('registration',
                                ['action'=>'review']);
                }

                // Go to the next step.
                return $this->redirect()->toRoute('registration');
            }
        }

        $viewModel = new ViewModel([
            'form' => $form
        ]);
        $viewModel->setTemplate("application/registration/step$step");

        return $viewModel;
    }

    /**
     * The "review" action shows a page allowing to review data entered on previous
     * three steps.
     */
    public function reviewAction()
    {
        // Validate session data.
        if(!isset($this->sessionContainer->step) ||
           $this->sessionContainer->step<=3 ||
           !isset($this->sessionContainer->userChoices)) {
            throw new \Exception('Sorry, the data is not available for review yet');
        }

        // Retrieve user choices from session.
        $userChoices = $this->sessionContainer->userChoices;

        return new ViewModel([
            'userChoices' => $userChoices
        ]);
    }
}
En el código de arriba tenemos tres métodos:
El constructor
__construct()se usa para inyectar la dependencia, en este caso el contenedor de sesión, dentro del controlador.El método de acción
indexAction()extrae el paso actual almacenado en la sesión e inicializa el modelo de formulario. Si el usuario ha enviado el formulario extraemos los datos del formulario y lo guardamos en la sesión e incrementamos el paso. Si el paso es mayor que 3, dirigimos al usuario a la página «Review».El método de acción
reviewAction()extrae los datos ingresados por el usuario en los tres pasos y los pasa a la vista para que sea mostrado en pantalla.
11.3.3.1. Agregar la clase RegistrationControllerFactory
Luego, agregamos la fábrica para el controlador RegistrationController. Para
hacer esto, agregamos el archivo RegistrationControllerFactory.php dentro
de la carpeta Controller/Form que está dentro de la carpeta fuente del modulo.
Colocamos el siguiente código dentro del archivo:
<?php
namespace Application\Controller\Factory;

use Interop\Container\ContainerInterface;
use Zend\ServiceManager\Factory\FactoryInterface;
use Application\Controller\RegistrationController;

/**
 * This is the factory for RegistrationController. Its purpose is to instantiate the
 * controller and inject dependencies into it.
 */
class RegistrationControllerFactory implements FactoryInterface
{
    public function __invoke(ContainerInterface $container,
                       $requestedName, array $options = null)
    {
        $sessionContainer = $container->get('UserRegistration');

        // Instantiate the controller and inject dependencies
        return new RegistrationController($sessionContainer);
    }
}
¡No olvidemos registrar el controlador en el archivo module.config.php!
11.3.4. Agregar las plantillas de vista
Ahora, vamos a agregar las plantillas de vista para las acciones del controlador.
Tenemos cuatro plantilla: step1.phtml, step2.phtml, step3.phtml y
review.phtml. Las tres primeras se usan en el indexAction() y la última
es usada por el método reviewAction().
Agregamos el archivo step1.phtml dentro de la carpeta application/registration y colocamos el siguiente código dentro del archivo:
<?php
$form->get('email')->setAttributes([
    'class'=>'form-control',
    'placeholder'=>'name@yourcompany.com'
    ]);

$form->get('full_name')->setAttributes([
    'class'=>'form-control',
    'placeholder'=>'John Doe'
    ]);

$form->get('password')->setAttributes([
    'class'=>'form-control',
    'placeholder'=>'Type password here (6 characters at minimum)'
    ]);

$form->get('confirm_password')->setAttributes([
    'class'=>'form-control',
    'placeholder'=>'Repeat password'
    ]);

$form->get('submit')->setAttributes(array('class'=>'btn btn-primary'));

$form->prepare();
?>

<h1>User Registration - Step 1</h1>

<div class="row">
    <div class="col-md-6">
        <?= $this->form()->openTag($form); ?>

        <div class="form-group">
            <?= $this->formLabel($form->get('email')); ?>
            <?= $this->formElement($form->get('email')); ?>
            <?= $this->formElementErrors($form->get('email')); ?>
        </div>

        <div class="form-group">
            <?= $this->formLabel($form->get('full_name')); ?>
            <?= $this->formElement($form->get('full_name')); ?>
            <?= $this->formElementErrors($form->get('full_name')); ?>
        </div>

        <div class="form-group">
            <?= $this->formLabel($form->get('password')); ?>
            <?= $this->formElement($form->get('password')); ?>
            <?= $this->formElementErrors($form->get('password')); ?>
        </div>

        <div class="form-group">
            <?= $this->formLabel($form->get('confirm_password')); ?>
            <?= $this->formElement($form->get('confirm_password')); ?>
            <?= $this->formElementErrors($form->get('confirm_password')); ?>
        </div>

        <div class="form-group">
        <?= $this->formElement($form->get('submit')); ?>
        </div>

        <?= $this->formElement($form->get('csrf')); ?>

        <?= $this->form()->closeTag(); ?>
    </div>
</div>
Luego, agregamos el archivo step2.phtml dentro de la carpeta application/registration y colocamos el siguiente código dentro de él:
<?php
$form->get('phone')->setAttributes([
    'class'=>'form-control',
    'placeholder'=>'Phone number in international format'
    ]);

$form->get('street_address')->setAttributes([
    'class'=>'form-control',
    ]);

$form->get('city')->setAttributes([
    'class'=>'form-control',
    ]);

$form->get('state')->setAttributes([
    'class'=>'form-control',
    ]);

$form->get('post_code')->setAttributes([
    'class'=>'form-control',
    ]);

$form->get('country')->setAttributes([
    'class'=>'form-control'
    ]);

$form->get('submit')->setAttributes(array('class'=>'btn btn-primary'));

$form->prepare();
?>

<h1>User Registration - Step 2 - Personal Information</h1>

<div class="row">
    <div class="col-md-6">
        <?= $this->form()->openTag($form); ?>

        <div class="form-group">
            <?= $this->formLabel($form->get('phone')); ?>
            <?= $this->formElement($form->get('phone')); ?>
            <?= $this->formElementErrors($form->get('phone')); ?>
        </div>

        <div class="form-group">
            <?= $this->formLabel($form->get('street_address')); ?>
            <?= $this->formElement($form->get('street_address')); ?>
            <?= $this->formElementErrors($form->get('street_address')); ?>
        </div>

        <div class="form-group">
            <?= $this->formLabel($form->get('city')); ?>
            <?= $this->formElement($form->get('city')); ?>
            <?= $this->formElementErrors($form->get('city')); ?>
        </div>

        <div class="form-group">
            <?= $this->formLabel($form->get('state')); ?>
            <?= $this->formElement($form->get('state')); ?>
            <?= $this->formElementErrors($form->get('state')); ?>
        </div>

        <div class="form-group">
            <?= $this->formLabel($form->get('post_code')); ?>
            <?= $this->formElement($form->get('post_code')); ?>
            <?= $this->formElementErrors($form->get('post_code')); ?>
        </div>

        <div class="form-group">
            <?= $this->formLabel($form->get('country')); ?>
            <?= $this->formElement($form->get('country')); ?>
            <?= $this->formElementErrors($form->get('country')); ?>
        </div>

        <div class="form-group">
        <?= $this->formElement($form->get('submit')); ?>
        </div>

        <?= $this->formElement($form->get('csrf')); ?>

        <?= $this->form()->closeTag(); ?>
    </div>
</div>
Luego, agregamos el archivo step3.phtml dentro de la carpeta application/registration y colocamos el siguiente código dentro del archivo:
<?php
$form->get('billing_plan')->setAttributes([
    'class'=>'form-control',
    ]);

$form->get('payment_method')->setAttributes([
    'class'=>'form-control',
    ]);

$form->get('submit')->setAttributes(array('class'=>'btn btn-primary'));

$form->prepare();
?>

<h1>User Registration - Step 3 - Billing Information</h1>

<div class="row">
    <div class="col-md-6">
        <?= $this->form()->openTag($form); ?>

        <div class="form-group">
            <?= $this->formLabel($form->get('billing_plan')); ?>
            <?= $this->formElement($form->get('billing_plan')); ?>
            <?= $this->formElementErrors($form->get('billing_plan')); ?>
        </div>

        <div class="form-group">
            <?= $this->formLabel($form->get('payment_method')); ?>
            <?= $this->formElement($form->get('payment_method')); ?>
            <?= $this->formElementErrors($form->get('payment_method')); ?>
        </div>

        <div class="form-group">
        <?= $this->formElement($form->get('submit')); ?>
        </div>

        <?= $this->formElement($form->get('csrf')); ?>

        <?= $this->form()->closeTag(); ?>
    </div>
</div>
Y finalmente, agregamos el archivo review.phtml dentro de la carpeta application/registration y colocamos el siguiente código dentro de él:
<h1>User Registration - Review</h1>

<p>Thank you! Now please review the data you entered in previous three steps.</p>

<pre>
<?php print_r($userChoices); ?>
</pre>
11.3.5. Agregar la ruta
Agregamos la siguiente ruta dentro de nuestro archivo de configuración module.config.php:
'registration' => [
    'type'    => Segment::class,
    'options' => [
        'route'    => '/registration[/:action]',
        'constraints' => [
            'action' => '[a-zA-Z][a-zA-Z0-9_-]*'
        ],
        'defaults' => [
            'controller'    => Controller\RegistrationController::class,
            'action'        => 'index',
        ],
    ],
],
¡Muy Bien! Ahora todo esta listo para ver los resultados.
11.3.6. Resultados
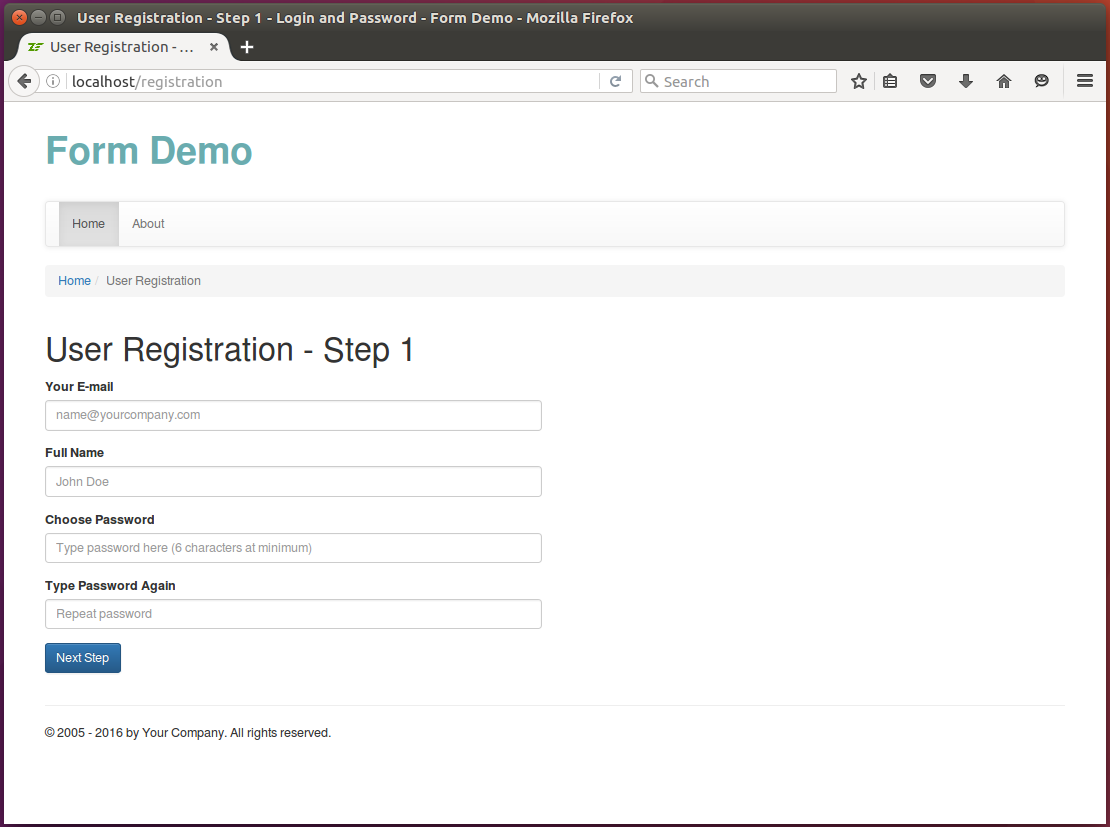
Para ver a nuestro formulario multi-pasos en acción escribimos la siguiente URL «http://localhost/registration» en la barra de navegación de nuestro navegador web. La página Registro de Usuario - Paso 1 aparecerá (ver figura 11.6 más abajo):
 Figura 11.6. Registro de Usuario - Paso 1
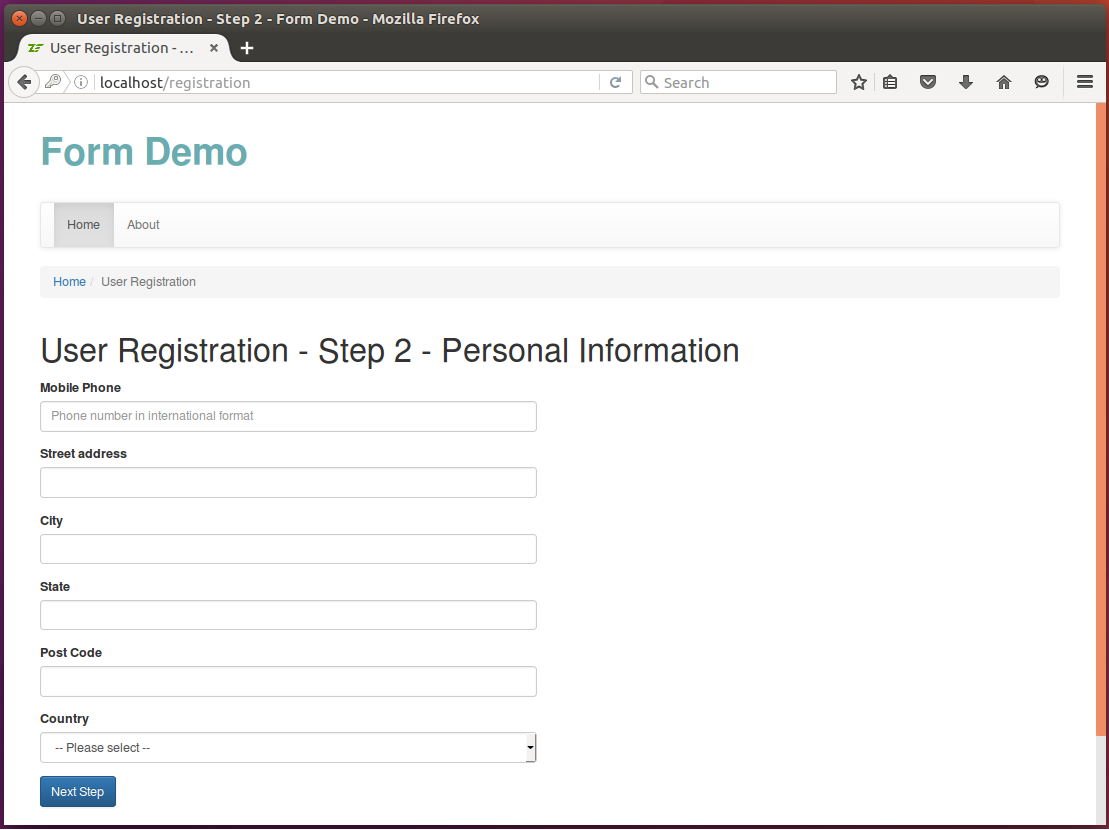
Una vez que el usuario agrego su dirección de correo electrónico, su nombre completo, su contraseña y hace clic en Next, el usuario es movido al siguiente paso (ver figura 11.7):
 Figura 11.7. Registro de Usuario - Paso 2
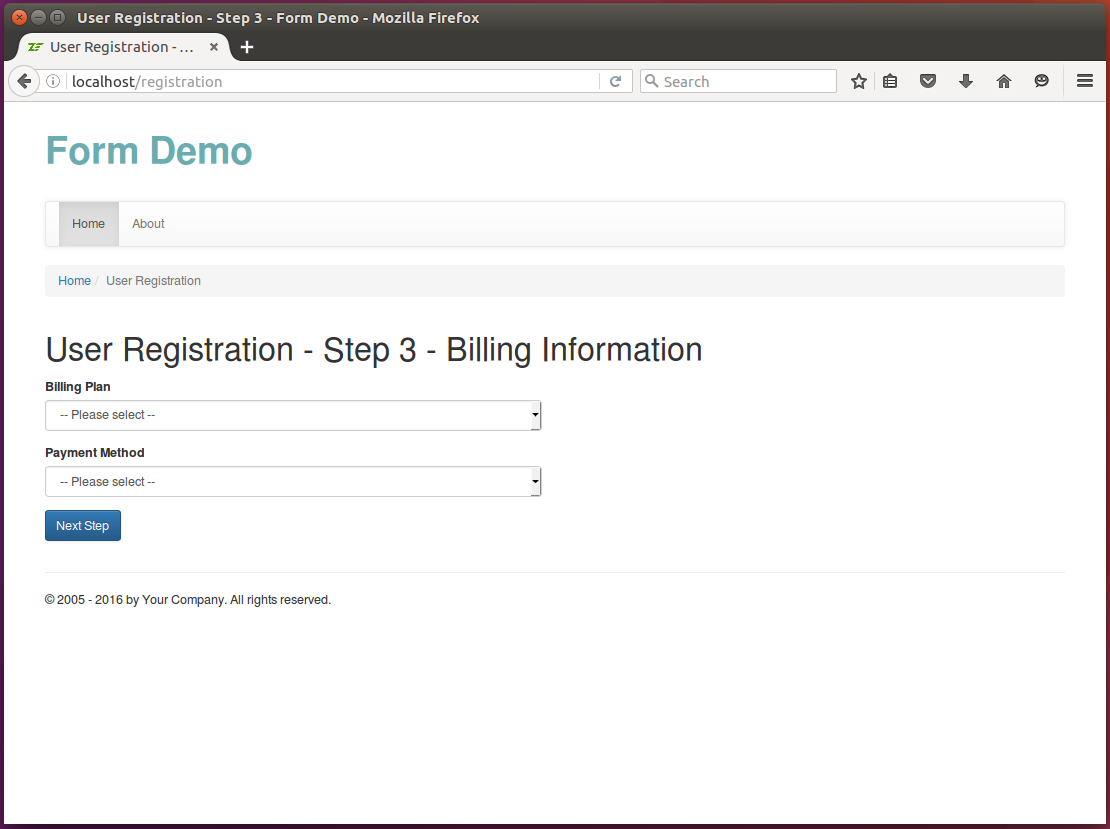
El paso final se muestra más abajo en la figura 11.8:
 Figura 11.8. Registro de Usuario - Paso 3
Haciendo clic en Next los resultados se muestran en la página Resumen que permite ver los datos ingresados en los tres pasos anteriores:
 Figura 11.9. Registro de Usuario - Resumen
Podemos encontrar este ejemplo completo en la aplicación Form Demo que se distribuye junto a este libro.


