


12.9. Agregar una Nueva Publicación
En esta sección crearemos la pagina web Agregar Nueva Publicación que permitirá agregar una nueva publicación al blog. Para esto, necesitaremos cuatro cosas:
- El modelo del formulario
PostFormse usa para ingresar y validar el título, contenido, estado y etiquetas de la publicación. - El modelo de servicio
PostManagercontendrá la lógica del negocio para guardar una nueva publicación en la base de datos. - El controlador
PostControllery su método de acciónPostController::addAction()se usa para traer los datos del formulario y llamar aPostManagerpara guardar los datos en la base de datos. - La plantilla de vista add.phtml que imprimirá el formulario.
12.9.1. Agregar el PostForm
Primero agregamos el formulario PostForm que permitirá ingresar los datos de una
publicación: título, contenido, una lista separada por comas de las etiquetas asociadas
con la publicación y el estado (publicado o borrador). Para hacer esto creamos el
archivo PostForm.php en la carpeta Form dentro de directorio fuente del modulo.
Colocamos el siguiente contenido dentro del archivo:
<?php

namespace Application\Form;

use Zend\Form\Form;
use Zend\InputFilter\InputFilter;
use Application\Entity\Post;

/**
 * This form is used to collect post data.
 */
class PostForm extends Form
{
    /**
     * Constructor.
     */
    public function __construct()
    {
        // Define form name
        parent::__construct('post-form');

        // Set POST method for this form
        $this->setAttribute('method', 'post');

        $this->addElements();
        $this->addInputFilter();
    }

    /**
     * This method adds elements to form (input fields and submit button).
     */
    protected function addElements()
    {

        // Add "title" field
        $this->add([
            'type'  => 'text',
            'name' => 'title',
            'attributes' => [
                'id' => 'title'
            ],
            'options' => [
                'label' => 'Title',
            ],
        ]);

        // Add "content" field
        $this->add([
            'type'  => 'textarea',
            'name' => 'content',
            'attributes' => [
                'id' => 'content'
            ],
            'options' => [
                'label' => 'Content',
            ],
        ]);

        // Add "tags" field
        $this->add([
            'type'  => 'text',
            'name' => 'tags',
            'attributes' => [
                'id' => 'tags'
            ],
            'options' => [
                'label' => 'Tags',
            ],
        ]);

        // Add "status" field
        $this->add([
            'type'  => 'select',
            'name' => 'status',
            'attributes' => [
                'id' => 'status'
            ],
            'options' => [
                'label' => 'Status',
                'value_options' => [
                    Post::STATUS_PUBLISHED => 'Published',
                    Post::STATUS_DRAFT => 'Draft',
                ]
            ],
        ]);

        // Add the submit button
        $this->add([
            'type'  => 'submit',
            'name' => 'submit',
            'attributes' => [
                'value' => 'Create',
                'id' => 'submitbutton',
            ],
        ]);
    }

    /**
     * This method creates input filter (used for form filtering/validation).
     */
    private function addInputFilter()
    {

        $inputFilter = new InputFilter();
        $this->setInputFilter($inputFilter);

        $inputFilter->add([
                'name'     => 'title',
                'required' => true,
                'filters'  => [
                    ['name' => 'StringTrim'],
                    ['name' => 'StripTags'],
                    ['name' => 'StripNewlines'],
                ],
                'validators' => [
                    [
                        'name'    => 'StringLength',
                        'options' => [
                            'min' => 1,
                            'max' => 1024
                        ],
                    ],
                ],
            ]);

        $inputFilter->add([
                'name'     => 'content',
                'required' => true,
                'filters'  => [
                    ['name' => 'StripTags'],
                ],
                'validators' => [
                    [
                        'name'    => 'StringLength',
                        'options' => [
                            'min' => 1,
                            'max' => 4096
                        ],
                    ],
                ],
            ]);

        $inputFilter->add([
                'name'     => 'tags',
                'required' => true,
                'filters'  => [
                    ['name' => 'StringTrim'],
                    ['name' => 'StripTags'],
                    ['name' => 'StripNewlines'],
                ],
                'validators' => [
                    [
                        'name'    => 'StringLength',
                        'options' => [
                            'min' => 1,
                            'max' => 1024
                        ],
                    ],
                ],
            ]);

        $inputFilter->add([
                'name' => 'status',
                'required' => true,
                'validators' => [
                    [
                        'name' => 'InArray',
                        'options'=> [
                            'haystack' => [Post::STATUS_PUBLISHED, Post::STATUS_DRAFT],
                        ]
                    ],
                ],
            ]);
    }
}
Como podemos ver en el código de arriba la clase PostForm define un formulario
de ZF3 con título, contenido, etiquetas y un campo para el estado, además, de un
botón Submit.
Como explicamos el funcionamiento de los formularios en capítulos previos aquí no explicaremos a profundidad el código que se presenta arriba.
12.9.2. Agregar el Servicio PostManager
De acuerdo con el patron de diseño guiado por el dominio colocamos la lógico del
negocio dentro de los modelos de servicio. En nuestro Blog de ejemplo crearemos
y registraremos el servicio PostManager. Este servicio tendrá el método público
addNewPost() que contiene la lógica de negocio que agrega una entidad Post a
la base de datos y la asocia con una o varias entidades Tag.
El servicio
PostManagercontendrá la lógica del negocio del Blog de ejemplo. Esta lógica de negocio incluye pero no se limita a agregar nuevas publicaciones al blog.
Creamos el archivo PostManager.php dentro de la carpeta Service dentro del directorio fuente del módulo, luego, colocamos el siguiente código dentro del archivo:
<?php
namespace Application\Service;

use Application\Entity\Post;
use Application\Entity\Comment;
use Application\Entity\Tag;
use Zend\Filter\StaticFilter;

// The PostManager service is responsible for adding new posts.
class PostManager
{
  /**
   * Doctrine entity manager.
   * @var Doctrine\ORM\EntityManager
   */
  private $entityManager;

  // Constructor is used to inject dependencies into the service.
  public function __construct($entityManager)
  {
    $this->entityManager = $entityManager;
  }

  // This method adds a new post.
  public function addNewPost($data)
  {
    // Create new Post entity.
    $post = new Post();
    $post->setTitle($data['title']);
    $post->setContent($data['content']);
    $post->setStatus($data['status']);
    $currentDate = date('Y-m-d H:i:s');
    $post->setDateCreated($currentDate);

    // Add the entity to entity manager.
    $this->entityManager->persist($post);

    // Add tags to post
    $this->addTagsToPost($data['tags'], $post);

    // Apply changes to database.
    $this->entityManager->flush();
  }

  // Adds/updates tags in the given post.
  private function addTagsToPost($tagsStr, $post)
  {
    // Remove tag associations (if any)
    $tags = $post->getTags();
    foreach ($tags as $tag) {
      $post->removeTagAssociation($tag);
    }

    // Add tags to post
    $tags = explode(',', $tagsStr);
    foreach ($tags as $tagName) {

      $tagName = StaticFilter::execute($tagName, 'StringTrim');
      if (empty($tagName)) {
        continue;
      }

      $tag = $this->entityManager->getRepository(Tag::class)
                 ->findOneByName($tagName);
      if ($tag == null)
        $tag = new Tag();
      $tag->setName($tagName);
      $tag->addPost($post);

      $this->entityManager->persist($tag);

      $post->addTag($tag);
    }
  }
}
Entre las líneas 25-43 tenemos el método público addNewPost() que toma la variable
$data como argumento (esta variable contendrá los datos del formulario que fue
llenado por el usuario del sitio web). Creamos una nueva instancia de la entidad
Post (línea 28) y llenamos su propiedades con los datos que ingreso el usuario.
Usamos el método persist() del EntityManager (línea 36) para agregar la nueva
entidad creada al administrador de entidades. El método privado addTagsToPost()
se llama (línea 39) para asignar a la publicación una o varias etiquetas. El método
flush() se usa para aplicar los cambios a la base de datos en una sola transacción
(línea 42).
El método privado addTagsToPost() contiene la lógica para remover las viejas asociaciones
entre la publicación y las etiquetas (líneas 49-52), luego, crea la lista de etiquetas
usando la coma como separador (línea 55) y se asignan las nuevas etiquetas a la
publicación (líneas 56-73).
Luego agregamos una factory para el servicio PostManager. Para hacer esto agregamos
el archivo PostManagerFactory.php en la carpeta Service/Factory dentro del
directorio fuente del módulo. Y colocamos el siguiente contenido dentro del archivo.
<?php
namespace Application\Service\Factory;

use Interop\Container\ContainerInterface;
use Zend\ServiceManager\Factory\FactoryInterface;
use Application\Service\PostManager;

/**
 * This is the factory for PostManager. Its purpose is to instantiate the
 * service.
 */
class PostManagerFactory implements FactoryInterface
{
    public function __invoke(ContainerInterface $container,
                    $requestedName, array $options = null)
    {
        $entityManager = $container->get('doctrine.entitymanager.orm_default');

        // Instantiate the service and inject dependencies
        return new PostManager($entityManager);
    }
}
Finalmente registramos el servicio PostManager modificando el archivo de configuración
module.config.php de la siguiente manera:
<?php
//...
return [
    //...
    'service_manager' => [
        //...
        'factories' => [
            Service\PostManager::class => Service\Factory\PostManagerFactory::class,
        ],
    ],
    //...
];
12.9.3. Crear el Controlador de tipo Acción y la plantilla de Vista
Para la administración de la publicación (es decir, agregar, editar, ver y remover
las publicaciones) crearemos la clase de tipo controlador PostController. Creamos
el método de acción addAction() dentro de la clase PostController que permitirá
agregar una nueva publicación al blog (ver el código de abajo):
class PostController extends AbstractActionController
{
    /**
     * Entity manager.
     * @var Doctrine\ORM\EntityManager
     */
    private $entityManager;

    /**
     * Post manager.
     * @var Application\Service\PostManager
     */
    private $postManager;

    /**
     * Constructor is used for injecting dependencies into the controller.
     */
    public function __construct($entityManager, $postManager)
    {
        $this->entityManager = $entityManager;
        $this->postManager = $postManager;
    }

    /**
     * This action displays the "New Post" page. The page contains
     * a form allowing to enter post title, content and tags. When
     * the user clicks the Submit button, a new Post entity will
     * be created.
     */
    public function addAction()
    {
        // Create the form.
        $form = new PostForm();

        // Check whether this post is a POST request.
        if ($this->getRequest()->isPost()) {

            // Get POST data.
            $data = $this->params()->fromPost();

            // Fill form with data.
            $form->setData($data);
            if ($form->isValid()) {

                // Get validated form data.
                $data = $form->getData();

                // Use post manager service to add new post to database.
                $this->postManager->addNewPost($data);

                // Redirect the user to "index" page.
                return $this->redirect()->toRoute('application');
            }
        }

        // Render the view template.
        return new ViewModel([
            'form' => $form
        ]);
    }
}
Arriba en la línea 33 creamos una instancia del formulario PostForm. En la línea
36 revisamos si es una petición POST. Si la petición es una petición POST llenamos
el formulario con los datos ingresados y luego validamos los datos. En caso de que
los datos sean validos llamamos al método addNewPost() del servicio PostManager
(línea 49) y redireccionamos a la lista de las publicaciones.
Para instanciar el PostController necesitaremos una factory. Creamos el controlador
de tipo factory agregando el archivo PostControllerFactory.php dentro de la carpeta
Controller/Factory del directorio fuente del módulo:
<?php
namespace Application\Controller\Factory;

use Interop\Container\ContainerInterface;
use Zend\ServiceManager\Factory\FactoryInterface;
use Application\Service\PostManager;
use Application\Controller\PostController;

/**
 * This is the factory for PostController. Its purpose is to instantiate the
 * controller.
 */
class PostControllerFactory implements FactoryInterface
{
    public function __invoke(ContainerInterface $container,
                           $requestedName, array $options = null)
    {
        $entityManager = $container->get('doctrine.entitymanager.orm_default');
        $postManager = $container->get(PostManager::class);

        // Instantiate the controller and inject dependencies
        return new PostController($entityManager, $postManager);
    }
}
Luego registramos el controlador PostController dentro del archivo modulo.config.php:
<?php
//...
return [
    //...
    'controllers' => [
        //...
        'factories' => [
            Controller\PostController::class =>
                           Controller\Factory\PostControllerFactory::class,
        ],
    ],
    //...
];
Luego agregamos la ruta posts para el nuevo controlador modificando el archivo module.config.php de la siguiente manera:
<?php
//...
return [
    //...
    'router' => [
        'routes' => [
            //...
            'posts' => [
                'type'    => Segment::class,
                'options' => [
                    'route'    => '/posts[/:action[/:id]]',
                    'constraints' => [
                        'action' => '[a-zA-Z][a-zA-Z0-9_-]*',
                        'id' => '[0-9]*'
                    ],
                    'defaults' => [
                        'controller'    => Controller\PostController::class,
                        'action'        => 'index',
                    ],
                ],
            ],
        ],
    ],
    //...
];
Finalmente, agregamos la plantilla de vista. Creamos el archivo add.phtml en la carpeta application/post dentro de la carpeta view del módulo y colocamos el siguiente código:
<?php
$form = $this->form;
$form->get('title')->setAttributes([
    'class'=>'form-control',
    'placeholder'=>'Enter post title here'
    ]);
$form->get('content')->setAttributes([
    'class'=>'form-control',
    'placeholder'=>'Type content here',
    'rows'=>6
    ]);
$form->get('tags')->setAttributes([
    'class'=>'form-control',
    'placeholder'=>'comma, separated, list, of, tags'
    ]);
$form->get('status')->setAttributes([
    'class'=>'form-control'
    ]);
$form->get('submit')->setAttributes(['class'=>'btn btn-primary']);
$form->prepare();

?>

<h1>Add New Post</h1>

<p>
    Please fill out the following form and click the <i>Create</i> button.
</p>

<div class="row">
    <div class="col-md-6">
        <?= $this->form()->openTag($form); ?>

        <div class="form-group">
            <?= $this->formLabel($form->get('title')); ?>
            <?= $this->formElement($form->get('title')); ?>
            <?= $this->formElementErrors($form->get('title')); ?>
        </div>

        <div class="form-group">
            <?= $this->formLabel($form->get('content')); ?>
            <?= $this->formElement($form->get('content')); ?>
            <?= $this->formElementErrors($form->get('content')); ?>
        </div>

        <div class="form-group">
            <?= $this->formLabel($form->get('tags')); ?>
            <?= $this->formElement($form->get('tags')); ?>
            <?= $this->formElementErrors($form->get('tags')); ?>
            <p class="help-block">Separate tags with comma.</p>
        </div>

        <div class="form-group">
            <?= $this->formLabel($form->get('status')); ?>
            <?= $this->formElement($form->get('status')); ?>
            <?= $this->formElementErrors($form->get('status')); ?>
        </div>

        <?= $this->formElement($form->get('submit')); ?>

        <?= $this->form()->closeTag(); ?>
    </div>
</div>
Ahora si abrimos la URL http://localhost/posts/add en el navegador web veremos la página Agregar Nueva Publicación como la que se muestra abajo en la figura 12.7:
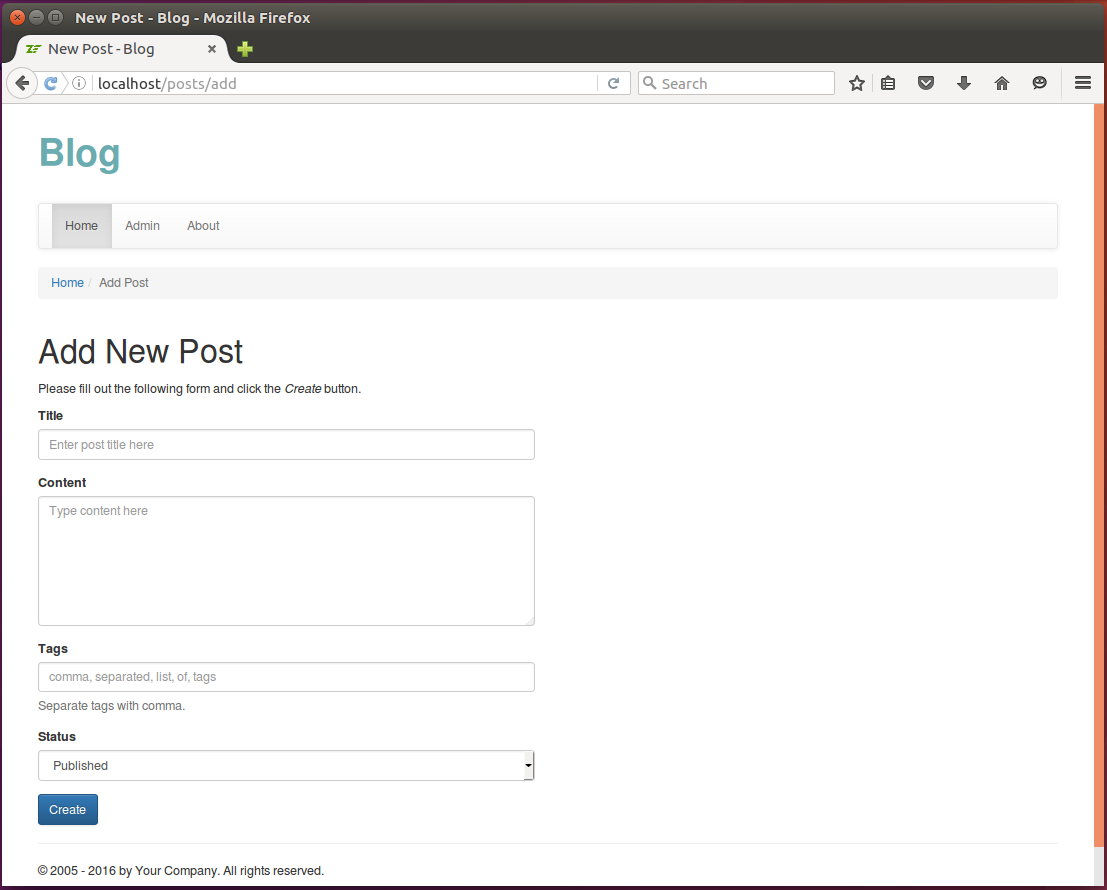 Figure 12.7. Página Agregar Nueva Publicación
Llenando el formulario y haciendo clic en el botón Crear guardamos la nueva publicación en la base de datos. Luego, podemos ver la publicación recién creada en la lista de publicaciones de la página Home.