14.2. How to Create a New Module?
There are at least two ways of creating a new module in your website. The first way is copying an existing module from APP_DIR/module directory (such as Application module), removing any unnecessary controllers, models and views, and renaming the existing namespace into your module name in every source file. This may be rather boring.
The second way is downloading an empty skeleton module from the official Zend Framework repository on GitHub. You can find this repository by this link. You can clone the code or download the code as a ZIP archive (recommended).
For example, in Linux, use the following commands to download the skeleton module:
cd ~
wget https://github.com/zendframework/ZendSkeletonModule/archive/master.zip
unzip master.zip
cp ZendSkeletonModule-master APP_DIR/module/ZendSkeletonModule
The commands above download the source of the skeleton module to your home directory, unpack the archive
and copy the files to your website's module directory.
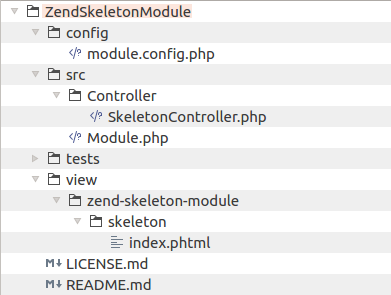
Let's look at the structure of the skeleton module (see figure 14.1):
 Figure 14.1. Skeleton module directory structure
As you can see, we have a typical directory structure we are already familiar with:
configsubdirectory containsmodule.config.phpfile which is the configuration file for this module.srcsubdirectory is a directory containing module's source files:Controllersubdirectory contains a sample controller class.Module.phpfile is the module entry point. We will discuss it a bit later.
testssubdirectory contains a stub for unit tests for this module. We do not cover unit tests in this book for simplicity.viewsubdirectory contains view scripts (and also may contain module-specific layout templates).
14.2.1. Renaming the Skeleton Module
Before you can use this new empty module, you should choose a name for it. A good name describes the module well.
For example, the name Admin is good when you need a module for backend stuff. Blog name would be good if you
plan to store blog functionality in this module. A good practice is also prepending some vendor name to the module
name, for example YourCompanyBlog.
Once you have chosen the name for the module, you should rename the directory containing module files. For example,
the command below will rename the module into Admin:
mv ZendSkeletonModule Admin
Next, you should rename the SkeletonController.php into something more descriptive. Don't forget to rename subdirectories
of view directory to reflect the name of the controller.
Finally, walk through configuration and source files of the controller and make sure you renamed the namespace ZendSkeletonModule
to the name of your module (this is required to ensure your classes will be found by PHP class autoloader).
14.2.2. Enabling Class Autoloading
The last step is to enable PHP class autoloading. Our module source files will be organised to conform to PSR-4 standard, so we will
be able to use standard autoloader provided by Composer. To do that, add the following line into your
composer.json file under the psr-4 key (substitute your module name):
...
"autoload": {
        "psr-4": {
            ...
            "Admin\\": "module/Admin/src/"
        }
    },
...
Next run the following command to update Composer autloader files:
php composer.phar dump-autoload
The
dump-autoloadcommand just regenerates autoloader code without installing or updating any dependencies.
Great! The module is now ready for use. You can add controllers, models and views into it. Do not forget to
modify the module.config.php file and register your routes, services, controllers, controller plugins, view helpers, etc.
14.2.3. Enabling the Module
To let ZF3 know about the new module and let it load it on app start up, do not forget to enable your new module in your APP_DIR/config/modules.config.php file as follows:
return [
    'Admin',
    //...
);


